
No-Bake Oreo Cheesecake: A Creamy Dream Come True!
Imagine sinking your spoon into a rich, creamy, and indulgent No-Bake Oreo Cheesecake that melts in your mouth, delivering a burst of chocolatey goodness. This delightful dessert requires no oven and can be whipped up in no time, making it the perfect choice for busy families or impromptu gatherings. Did you know that this treat combines two beloved classics—cheesecake and Oreos—into one spectacular dessert? Who wouldn’t want to indulge in that?! It’s easy to make, packed with flavor, and guaranteed to be a hit with both kids and adults alike.
If you’re a fan of our decadent Chocolate Lava Cake, you’re going to fall head over heels for this No-Bake Oreo Cheesecake! It’s just as satisfying but with the added bonus of not needing to bake. So let’s dive in and make dessert magic happen with this incredibly simple and delicious recipe!

What is No-Bake Oreo Cheesecake?
If I asked you to imagine a dessert that’s rich, creamy, and utterly delicious without the hassle of baking, would you picture the No-Bake Oreo Cheesecake? This delightful dessert has the magic of transforming Oreos and cream cheese into a velvety cheesecake that sets in the fridge instead of the oven. It’s like your favorite cookie and birthday cake had a fantastic baby! Have you ever heard the saying, “the way to a man’s heart is through his stomach?” Well, trust me; this cheesecake will charm its way into anyone’s heart (or stomach!). So, are you ready to add this dreamy treat to your baking repertoire? Let’s get started on creating your own No-Bake Oreo Cheesecake!
Why You’ll Love This No-Bake Oreo Cheesecake
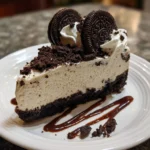
This No-Bake Oreo Cheesecake is a dessert that checks all the boxes: it’s rich, creamy, and oh-so-chocolaty. What could be better than a cheesecake that captures the essence of everyone’s favorite cookie? Plus, making this scrumptious dessert at home is not only way more cost-effective than purchasing a fancy store-bought cake, but you’ll also have complete control over the quality of ingredients! With each luscious bite, you’ll enjoy layers of Oreo crust and creamy cheesecake filling topped with edible cookie crumbles. Want to make it extra special? Add whipped cream, chocolate drizzle, or even a sprinkle of cocoa powder!
If you’ve tried our luscious Tiramisu before, you’ll find this No-Bake Oreo Cheesecake to have a similar creamy dreamy quality, while bringing its unique flavor to the table. Why not make both for an amazing dessert spread? Your guests will love it!
How to Make No-Bake Oreo Cheesecake
Quick Overview
This No-Bake Oreo Cheesecake is your go-to treat for easy and delicious dessert satisfaction! With just a few simple steps and a prep time of about 20 minutes (plus chilling time), you’ll have a luscious cheesecake ready to wow your family and friends.
Key Ingredients for No-Bake Oreo Cheesecake
Here’s what you’ll need to whip up this sweet delight:
- Oreos: 24 cookies (plus additional for garnish)
- Unsalted Butter: 1/2 cup, melted
- Cream Cheese: 16 oz, softened
- Powdered Sugar: 1 cup
- Vanilla Extract: 1 tsp
- Heavy Whipping Cream: 2 cups, cold
Step-by-Step Instructions
- Prepare the Oreo Crust:
- Begin by crushing the Oreos in a food processor until they reach a fine crumb texture.
- In a mixing bowl, combine the crushed Oreos with melted butter. Mix until combined.
- Press the mixture into the bottom of a 9-inch springform pan, ensuring even coverage.
- Make the Cheesecake Filling:
- In a medium bowl, beat the softened cream cheese until smooth and creamy.
- Slowly add in powdered sugar and vanilla extract, mixing until thoroughly combined.
- In a separate bowl, whip the cold heavy cream until stiff peaks form. Gently fold the whipped cream into the cream cheese mixture until fully incorporated.
- Assemble the Cheesecake:
- Pour the cheesecake filling over the Oreo crust in the springform pan, smoothing the top with a spatula.
- Finish by garnishing with crushed Oreo pieces on top.
- Chill and Serve:
- Cover the cheesecake with plastic wrap and refrigerate for at least 4-5 hours, or overnight for best results.
- Once chilled and set, remove from the springform pan, slice, and enjoy!
What to Serve No-Bake Oreo Cheesecake With
Pair your delectable No-Bake Oreo Cheesecake with a variety of delightful accompaniments! A dollop of whipped cream adds lightness, while a drizzle of chocolate sauce brings an indulgent touch. Fresh strawberries or raspberries can provide a lovely tart contrast to the rich creaminess. For a fun twist, consider serving it alongside a scoop of vanilla or mint ice cream! You’ll create a dream dessert plate that will surely be unforgettable.
Top Tips for Perfecting No-Bake Oreo Cheesecake
To truly master this No-Bake Oreo Cheesecake, here are a few helpful tips:
- Use Room Temperature Cream Cheese: It blends more easily and creates a smoother filling.
- Don’t Rush the Chilling: Allow sufficient time for the cheesecake to fully set; overnight is best!
- Customize Your Toppings: Feel free to get creative with toppings—chocolate shavings, cookie crumbles, or even fruits!
Storing and Reheating Tips
Leftovers are a succulent bonus! Store any uneaten cheesecake slices in an airtight container in the refrigerator for up to 5 days. To freeze, wrap each slice tightly in plastic wrap, then place them in a freezer-safe container or bag for up to 2 months. When you’re ready to enjoy again, simply thaw them in the refrigerator overnight. Do not attempt to reheat as this is best served chilled!
Whether you’re planning a family gathering, a birthday celebration, or just looking for a delicious way to treat yourself, this No-Bake Oreo Cheesecake is sure to please taste buds and create lasting memories. So gather your ingredients, follow these easy steps, and get ready to savor each creamy, chocolaty bite!
No-Bake Oreo Cheesecake
Ingredients
Method
- Crush the Oreos in a food processor until they reach a fine crumb texture.
- In a mixing bowl, combine the crushed Oreos with melted butter. Mix until combined.
- Press the mixture into the bottom of a 9-inch springform pan, ensuring even coverage.
- In a medium bowl, beat the softened cream cheese until smooth and creamy.
- Slowly add in powdered sugar and vanilla extract, mixing until thoroughly combined.
- In a separate bowl, whip the cold heavy cream until stiff peaks form. Gently fold the whipped cream into the cream cheese mixture until fully incorporated.
- Pour the cheesecake filling over the Oreo crust in the springform pan, smoothing the top with a spatula.
- Finish by garnishing with crushed Oreo pieces on top.
- Cover the cheesecake with plastic wrap and refrigerate for at least 4-5 hours, or overnight for best results.
- Once chilled and set, remove from the springform pan, slice, and enjoy!
Leave a Reply