
If you’re on the hunt for a culinary game-changer that will elevate your dishes from ordinary to extraordinary, look no further than homemade Garlic Chili Oil. This spicy, savory concoction is not just an oil; it’s a flavor powerhouse that you can whip up in your own kitchen! Have you ever had that moment when your dish feels like it’s missing something? That’s where Garlic Chili Oil comes in, adding the perfect punch of heat and aroma that you didn’t know you were craving.
What makes this recipe even more special is its simplicity, allowing you to create a gourmet condiment without breaking a sweat. It’s a staple that can greatly enhance family gatherings, giving your meals a cozy, inviting vibe reminiscent of warm kitchens filled with love and laughter. Unlike other complex sauces, making Garlic Chili Oil resembles my easy-to-make Herb-Infused Olive Oil blog post, but with an added hint of spice that truly transforms your culinary creations. So, roll up your sleeves, and let’s dive into this delightful recipe!
What is Garlic Chili Oil?
Garlic Chili Oil – the name alone is enough to make your mouth water, isn’t it? But have you ever wondered how it got its catchy name? Was there a mysterious chili whispering culinary secrets to a sleepy garlic clove? Speaking of secrets, did you know that the way to a man’s heart is through his stomach? A drizzle of this oil over any dish will certainly get their attention! Whether you use it to spice up your stir-fries, finish a pizza, or add a splash to a comforting bowl of noodles, it’s an essential companion in every kitchen.
So, why not take a moment to make this easy and delectable seasoning? Your taste buds will thank you!
Why You’ll Love This Garlic Chili Oil
When you discover the wonders of Garlic Chili Oil, you’ll realize it can instantly improve any main dish. Imagine a sizzling plate of stir-fried vegetables or noodles topped with a generous drizzle of this aromatic oil—dishes come alive in flavor! Plus, making your own Garlic Chili Oil is a cost-effective alternative to store-bought versions. Who wouldn’t want to save some money while bringing bold tastes to the dinner table?
What’s more, this oil stands out from its less thrilling counterparts, like standard olive oil. Feel free to experiment with a splash over salads, roasted vegetables, or even grilled meats for a flavorful twist. So why keep your taste buds waiting? Grab those ingredients, and let’s get cooking!
How to Make Garlic Chili Oil
Quick Overview
Creating your own Garlic Chili Oil is as easy as it gets! In a mere 20 minutes, you’ll have a robustly flavored condiment that carries a crispy texture and aromatic warmth. Are you ready to infuse your meals with irresistible flavors and enticing aromas? Let’s do this!
Ingredients
To make this delicious Garlic Chili Oil, gather the following ingredients:
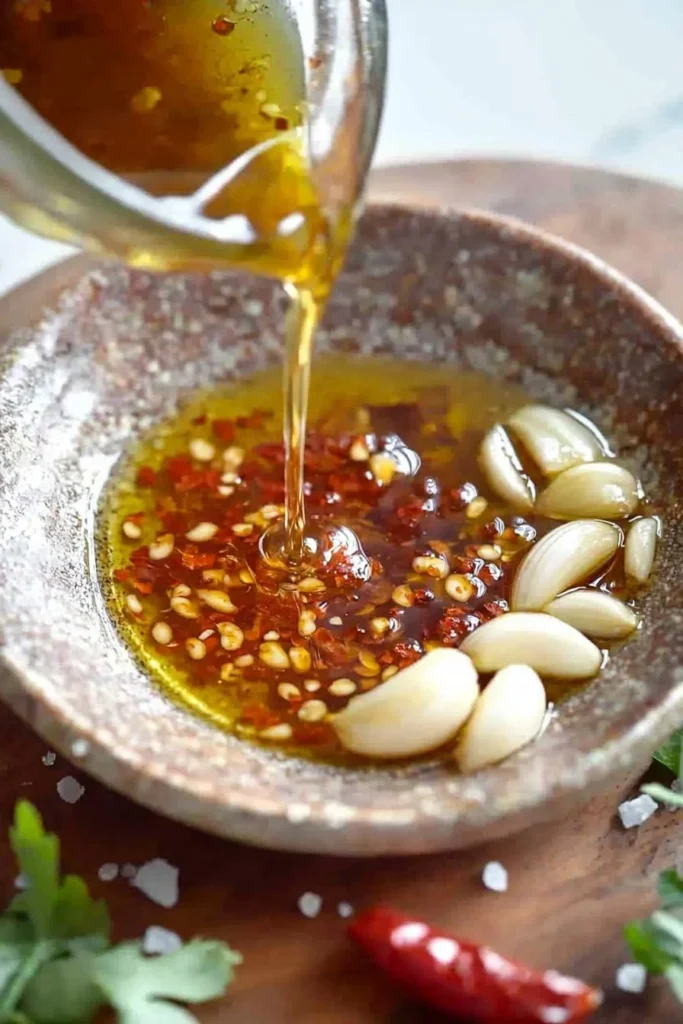
- 1 cup oil (vegetable or olive)
- 10-12 garlic cloves, minced
- 2-3 tablespoons red chili flakes
- 1 teaspoon salt
Note: Be sure to use oil that is Halal-certified without any alcohol-based ingredients.
Step-by-Step Instructions
- Heat the Oil: In a small saucepan, heat the cup of oil over medium heat. Make sure it gets warm, but don’t let it smoke!
- Add Garlic: Once the oil is hot, carefully add the minced garlic. Stir continuously to prevent it from burning. You want it to turn a beautiful golden color.
- Incorporate Chili Flakes: As soon as the garlic reaches your desired golden hue (about 2-3 minutes), stir in the red chili flakes. Let them sizzle for another minute for maximum flavor extraction.
- Season with Salt: Finally, sprinkle in the teaspoon of salt and give everything a good stir. Remove from heat.
- Cool and Store: Allow the mixture to cool completely before transferring it to a clean, dry jar. Your Garlic Chili Oil is now ready to use!
Top Tips for Perfecting Garlic Chili Oil
- Oil Options: For a different flavor note, you can experiment with oils like peanut oil or sesame oil for an Asian-inspired twist. Just ensure they are Halal-compliant.
- Timing is Key: Don’t rush the garlic; allowing it to reach the right golden shade will intensify the flavor.
- Storage: Be sure to let it cool completely to prevent condensation in the jar, which can affect the oil’s longevity.
Storing and Reheating Tips
Your homemade Garlic Chili Oil can be stored in a cool, dark place for up to two weeks. If you want to extend its shelf life, consider refrigerating it; however, it may solidify. When you’re ready to use it, simply place it in a warm spot, and it will return to its liquid form. If you’ve made a big batch, feel free to freeze small portions in ice cube trays for on-demand flavor at your fingertips.
So, are you ready to take your culinary game to the next level? This Garlic Chili Oil can’t wait to bring a touch of spice and flavor to your everyday meals. Whether drizzled over pastas, added to soups, or simply enjoyed with bread, it’s the versatile companion you didn’t know you needed. Don’t hesitate—gather your ingredients and unleash the magic of Garlic Chili Oil in your kitchen today!

Frequently Asked Questions
- Can I use fresh herbs in the garlic chili oil?
Yes, fresh herbs like parsley or basil can be added for more flavor. Just ensure they are dried adequately to prevent moisture. - Is this recipe scalable?
Absolutely! You can double or triple the quantities based on your needs. - Can I use different spices?
Of course! Feel free to experiment with other spices, but always ensure they’re Halal-compliant.
After all, the heart of every great dish lies in its flavors, and your Garlic Chili Oil promises just that!
Garlic Chili Oil
Ingredients
Method
- In a small saucepan, heat the cup of oil over medium heat until it gets warm, but do not let it smoke.
- Once the oil is hot, carefully add the minced garlic and stir continuously to prevent burning. Aim for a beautiful golden color.
- As soon as the garlic reaches the desired golden hue (about 2-3 minutes), stir in the red chili flakes and let them sizzle for another minute for maximum flavor extraction.
- Sprinkle in the teaspoon of salt and give everything a good stir before removing from heat.
- Allow the mixture to cool completely before transferring it to a clean, dry jar.
Leave a Reply