
Butterfinger balls are a no-bake candy: a sweetened peanut butter dough packed with crushed Butterfinger bars, rolled into bites and dipped in melted chocolate. Twenty minutes of work and about fifty of waiting — thirty in the fridge, twenty for the shell to set — give you roughly twenty-four pieces with a soft centre and a crisp coating.

Why This Is Worth Twenty Minutes
- No oven, no thermometer, no candy stage to hit. The only heat involved is a bowl of chocolate in the microwave.
- The crushed bars stay crunchy inside the soft filling, so every bite has two textures instead of one.
- They hold their shape at room temperature for hours, which makes them easy to carry to a party or set out on a platter.
Ingredients
For the filling
- 1 cup (260 g) creamy peanut butter — the shelf-stable kind, not natural
- ¼ cup (57 g) unsalted butter, softened
- 1 teaspoon vanilla extract
- ¼ teaspoon fine salt
- 1½ cups (180 g) powdered sugar, sifted
- 3 full-size Butterfinger bars (1.9 oz / 54 g each), finely crushed — about 1½ cups, with 2 tablespoons set aside for the tops
For the coating
- 12 oz (340 g) semi-sweet chocolate chips or melting wafers
- 1 tablespoon refined coconut oil
| Ingredient | What it does | Swap |
|---|---|---|
| Creamy peanut butter | Binds the dough and carries the flavour. Shelf-stable brands hold their emulsion, so the filling stays smooth instead of weeping oil. | Crunchy peanut butter, for more texture. Avoid natural peanut butter that separates in the jar. |
| Powdered sugar | Sweetens and, more importantly, stiffens. Its cornstarch absorbs the oil from the peanut butter so the dough rolls cleanly. | None that works the same way. Granulated sugar stays gritty and will not firm the dough. |
| Coconut oil in the chocolate | Thins the melted chocolate so it coats in a thin, even layer rather than a thick cap that cracks. | Vegetable shortening, same amount. Butter will not work — its water content seizes the chocolate. |
Peanut butter keeps for roughly three months in the pantry once opened, and about nine refrigerated, according to Ohio State University Extension. If your jar has been open a while, taste it first — rancid peanut butter is the one flaw this recipe cannot hide. The same dough base, without the candy bars, becomes peanut butter balls.
Step by Step
1. Crush the bars
Put the Butterfinger bars in a zip-top bag, press out the air and roll a rolling pin over them, or pulse them briefly in a food processor. You want a mix of fine crumbs and small shards, not dust — the shards are what stay crunchy. Set 2 tablespoons aside for the tops. The same crushing method is how you start Butterfinger puppy chow.
The crumbs should look like coarse sand with a few pieces the size of a lentil.
2. Beat the base
Beat the peanut butter, softened butter, vanilla and salt together until the mixture is uniform and slightly lighter in colour, about a minute with a hand mixer or two by hand.
No streaks of butter should remain, and the mixture should fall off the beater in a thick ribbon.
3. Work in the sugar, then the candy
Add the sifted powdered sugar in two additions, mixing until it disappears. Fold in the crushed bars last, by hand, so you do not pulverise them.
The dough should hold together when you squeeze a spoonful and feel like firm cookie dough. If it crumbles, add peanut butter a teaspoon at a time; if it sticks to your palms, add powdered sugar the same way.
4. Roll and chill
Scoop tablespoon portions and roll them between your palms into 1-inch balls, setting them on a parchment-lined tray. Refrigerate for 30 minutes.
A chilled ball should feel firm all the way through and not dent under light pressure. Warm balls fall apart on the fork.
5. Melt the chocolate gently
Combine the chocolate and coconut oil in a dry, microwave-safe bowl. Heat at 50% power for 1 minute, stir, then continue in 20-second bursts, stirring after each, until only a few lumps remain. Stir those out off the heat — the residual warmth will finish them.
The chocolate should flow off the spoon in a smooth ribbon. If it turns grainy and stiff, a drop of water got in and it has seized.
6. Dip, top and set
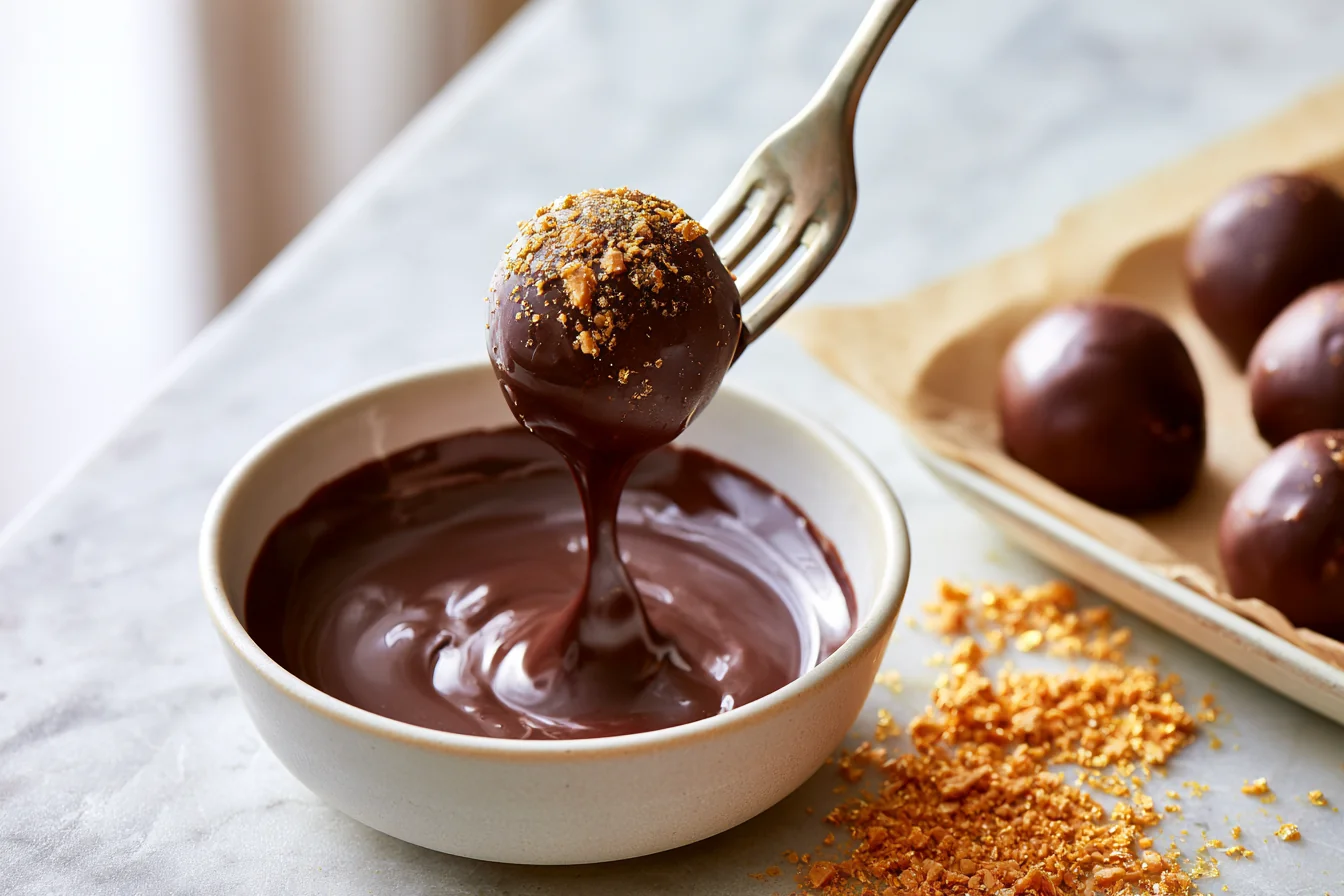
Drop a ball into the chocolate, lift it out on a fork, and tap the fork against the rim so the excess drains back. Return it to the parchment and scatter a pinch of the reserved crumbs on top while the coating is still wet.
The shell should look glossy and even, with the ball still visible as a dome rather than buried under a thick pool.
When the Shell Has Set
There is no internal temperature to chase here, because nothing is cooked. What you are judging is the set.
Leave the dipped balls at room temperature for about 20 minutes. The coating is set when it looks matte-glossy rather than wet, feels dry to a light touch, and snaps cleanly when you bite one — a soft, fingerprint-taking shell means it needs more time. In a warm kitchen, 10 minutes in the fridge does the same job, though the surface may dull slightly.
Inside, the filling should stay soft and sliceable, never hard. If it sets rock-solid, the dough had too much powdered sugar.
Where It Goes Wrong
- Melting the chocolate at full power. Chips scorch from the inside out and never recover. Half power and short bursts cost an extra minute and save the batch.
- Letting water near the bowl. A wet spoon or steam from a double boiler will seize the chocolate into a grainy paste. Dry everything first.
- Dipping warm balls. They soften in the chocolate, slide off the fork and cloud the bowl with crumbs.
- Crushing the bars to powder. You lose the crunch that distinguishes these from plain peanut butter balls.
- Adding the candy before the sugar. The mixer will grind the shards down while it works in the powdered sugar.
Worth Trying
- White chocolate. Swap the semi-sweet for white melting wafers and keep the coconut oil. The contrast with the orange crumbs is striking, though the result is noticeably sweeter.
- Salted. A few flakes of sea salt on the wet coating cut the sugar and make the peanut flavour read more clearly.
- Cream cheese filling. Replace the butter with 2 oz of softened cream cheese for a tangier, softer centre, closer to no-bake peanut butter cheesecake balls.
- Different candy. The method works with any crunchy bar. Crushed sandwich cookies turn it into Oreo chocolate balls.
- Half-dipped. Coat only the bottom half and leave the top bare, which halves the chocolate and shows off the filling.
How Long They Keep
Airtight and out of the sun, they hold two days at room temperature; after that the filling softens and the crumbs lose their crunch. In the refrigerator they keep about two weeks, in a single layer or separated by parchment, and the centre firms up — give them ten minutes out of the fridge before serving. Frozen, they keep up to three months: freeze them on the tray first, then bag them, and thaw them in the refrigerator overnight so no condensation forms on the shell.
The undipped dough keeps too. Roll the balls, chill them, and freeze them bare for up to a month, then dip them straight from frozen whenever you need a tray of something.
Serving Them
- A platter alongside Butterfinger cheesecake bars, which use the same candy in a sliceable form.
- Black coffee or unsweetened iced tea — the bitterness keeps the sugar in check better than milk does.
- Butterfinger caramel crunch bars for a dessert table that stays on one theme.
- A scoop of vanilla ice cream with a ball crumbled over it, which is the easiest way to use any that break.
FAQ
Why are my Butterfinger balls falling apart?
The dough is too loose, almost always because the peanut butter was natural or the powdered sugar was short-measured. Add powdered sugar a tablespoon at a time until a squeezed spoonful holds its shape, then chill for a full 30 minutes before rolling.
Can I use Butterfinger baking bits instead of bars?
Yes, and they save you the crushing. Use the same volume. The bits are more uniform, so the filling has less textural contrast than crushed bars give you.
Do Butterfinger balls need to be refrigerated?
Not for safety — nothing in them is perishable at room temperature. Refrigerate them for texture: the filling stays firm and the shell stays crisp. Two days on the counter is fine for serving.
Why did my chocolate get thick and grainy?
It seized, which happens when a trace of water meets melted chocolate, or when the chocolate overheats. Neither is reversible for dipping. Start again with a dry bowl, half power and short bursts.
Can I make these without chocolate coating?
Yes. Roll the chilled balls in the reserved crushed candy instead. They are less tidy to handle but every bit as good, and the prep drops to about 20 minutes total.
Butterfinger Balls
Ingredients
Equipment
Method
- Crush the Butterfinger bars in a sealed bag with a rolling pin, or pulse them briefly in a food processor, until you have coarse crumbs with a few small shards. Set 2 tablespoons aside for the tops.
- Beat the peanut butter, softened butter, vanilla and salt together until uniform and slightly lighter in colour, about 1 minute.
- Add the sifted powdered sugar in two additions, mixing until it disappears. Fold in the crushed bars by hand so the shards stay intact.
- Scoop tablespoon portions and roll them into 1-inch balls. Set them on a parchment-lined tray and refrigerate for 30 minutes.
- Combine the chocolate and coconut oil in a dry microwave-safe bowl. Heat at 50% power for 1 minute, stir, then continue in 20-second bursts, stirring after each, until only a few lumps remain. Stir those out off the heat.
- Drop a chilled ball into the chocolate, lift it out on a fork and tap the fork against the rim so the excess drains back into the bowl.
- Return each ball to the parchment and scatter a pinch of the reserved crumbs over the wet coating.
- Leave at room temperature for about 20 minutes, until the shell is dry to the touch and snaps when bitten. Refrigerate for 10 minutes instead if the kitchen is warm.
Notes

Leave a Reply