
Creating a personalized charcuterie board is like painting a masterpiece on a platter! With a delightful array of flavors, textures, and colors, a charcuterie board invites everyone to revel in the joy of snacking together. Just imagine your guests savoring bites of creamy cheeses, succulent fruits, and an assortment of delicious treats—all artfully arranged for an eye-catching presentation. Fun fact: charcuterie boards have a rich history dating back to the 15th century in France, where they were developed to preserve meats, but today they have evolved into a versatile canvas for creativity, perfect for any occasion.
This recipe is special not only because it’s visually stunning but also because it can be whipped up in no time, making it ideal for gatherings or cozy family nights. Compared to a classic cheese platter, which can feel a bit boring and predictable, a charcuterie board is interactive—a fun way for everyone to build their own perfect bite! So get ready to embark on a culinary adventure and elevate your next gathering with a personalized charcuterie board that will have everyone coming back for seconds (or thirds)!
What is Personalized Charcuterie Board?
Now, you might be wondering, “What’s the deal with a charcuterie board?” For those who may not be familiar, it’s a beautifully arranged platter featuring a selection of cured meats, cheeses, fruits, nuts, and other delicious morsels. But let’s be real—do we really need fancy French terms to enjoy a pile of yummy snacks? I think not! The word “charcuterie” comes from the French for “cooked meat,” but it’s evolved to include an entire world of flavors. They say, “the way to a man’s heart is through his stomach,” and trust me, a personalized charcuterie board is the way to do it! So, gather your favorite ingredients, channel your inner artist, and let’s create something delicious together!
Why You’ll Love This Personalized Charcuterie Board
There are three key reasons you’ll fall in love with your personalized charcuterie board. Firstly, the main highlight is the ability to customize it to your taste preferences. Want to include spicy peppers, sweet honey, or maybe a dash of artisanal mustard? You got it! Secondly, making your own charcuterie board at home is more cost-effective than buying pre-made versions from stores. You can pick and choose your ingredients without breaking the bank. Finally, the array of flavors—from creamy Brie to crunchy crackers—creates an irresistible experience for the senses, ensuring there’s something for everyone. If you enjoy the fun of a taco bar or a s’mores station, you’ll adore this DIY approach. So, get ready to impress your family and friends by bringing the magic of your personalized charcuterie board to life!
How to Make a Personalized Charcuterie Board
Quick Overview
Creating a personalized charcuterie board is easier than you might think! This delicious arrangement takes only about 30 minutes to prepare, making it perfect for impromptu gatherings or cozy nights in. With a mouthwatering assortment of cheeses, meats, fruits, and various spreads, you’ll have an elegant dish that’s sure to delight.
Key Ingredients for Personalized Charcuterie Board
- Cheeses: Hard cheeses like aged cheddar, soft cheeses like Brie, and blue cheese
- Meats: Salami, prosciutto, or any cured meats of your choice
- Fruits: Grapes, berries, sliced apples, or figs
- Nuts: Almonds, walnuts, or pecans
- Crackers: Variety of shapes and textures
- Spreads: Honey, jam, or hummus
- Vegetables: Cherry tomatoes, cucumber slices, or pickles
Step-by-Step Instructions:
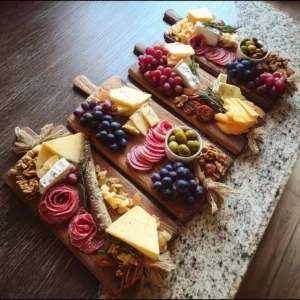
- Select Your Board: Choose a large wooden cutting board or platter—a rustic wooden board adds to the aesthetics!
- Arrange the Cheese: Start by placing your cheeses on the board. Space them out to create visual interest, and consider cutting some into slices or cubes.
- Add the Meats: Fold or roll your cured meats and arrange them alongside the cheeses.
- Fill in with Fruits and Nuts: Scatter your fruits and nuts in the spaces between the cheeses and meats, creating a colorful and vibrant look.
- Include Crackers: Choose a few types of crackers and place them around the board for various textures.
- Precise Placement of Spreads: Fill small bowls with the spreads and place them strategically on the board, along with a serving spoon.
- Finish with Vegetables: Lastly, fill any leftover spaces with fresh vegetables for added color and crunch.
What to Serve with Your Personalized Charcuterie Board
A personalized charcuterie board pairs wonderfully with a variety of beverages. Consider serving it alongside a refreshing white wine or sparkling water with lemon. If you want something a bit more robust, a nice red wine can complement the rich flavors of the meats and cheeses. For a non-alcoholic option, a crisp apple cider or flavored sparkling water will balance the savory elements beautifully.
Top Tips for Perfecting Your Personalized Charcuterie Board
- Mix Textures: Combine hard and soft cheeses for contrasting textures, and add both creamy and crunchy items for depth.
- Seasonal Ingredients: Use seasonal fruits and vegetables for the freshest taste and vibrant colors.
- Garnish: Fresh herbs like rosemary or thyme can add a pop of color and aroma.
- Taste Elements: Consider incorporating a variety of flavors ranging from sweet to savory—including dark chocolate for a surprise treat!
- Don’t Stress: Remember, the beauty of a charcuterie board lies in its casual arrangement. It doesn’t have to be perfect!
Storing and Reheating Tips
If you’ve prepared more than you can enjoy in one sitting, don’t worry! Store any leftovers in an airtight container in the fridge for up to two days. Keep in mind that while the cheeses and meats can last in the fridge, fruits may not maintain their freshness for long. To enjoy your charcuterie board again, just pull it out and add some fresh fruits or crackers to revive it, and it’ll be as good as new!
Now, it’s your turn to create an unforgettable personalized charcuterie board that will have your friends and family talking long after the last bite! Happy snacking!

Personalized Charcuterie Board
Ingredients
Method
- Select a large wooden cutting board or platter.
- Arrange the cheeses on the board, cutting some into slices or cubes for visual interest.
- Fold or roll the cured meats and place them alongside the cheeses.
- Scatter the fruits and nuts around the cheeses and meats to create a colorful display.
- Add various types of crackers around the board.
- Fill small bowls with spreads and place them on the board with a serving spoon.
- Fill any leftover spaces with fresh vegetables for added color and crunch.
Leave a Reply