
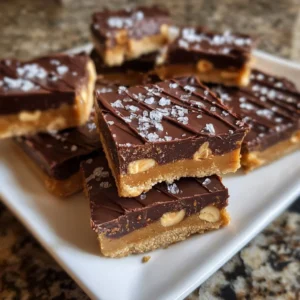
Are you on the hunt for a dessert that’s not only utterly delicious but also quick to whip up? Look no further! These No-Bake Chocolate Cashew Butter Bars are the perfect solution for any sweet tooth. Imagine rich, velvety chocolate combined with the smooth, nutty flavor of cashew butter, all without the hassle of turning on an oven! With just a few simple ingredients and minimal prep time, you can create a luxurious treat that will leave your family begging for more. Plus, these bars are perfect for any occasion—be it a spontaneous snack or a fun dessert for gatherings.
Fun fact: Did you know that no-bake desserts are often popular during hot summer months when turning on the oven feels like a daunting task? They allow you to enjoy something sweet without overheating your kitchen. If you love chocolatey goodness, you might also enjoy my No-Bake Strawberry Chocolate Clusters, so be sure to check that out! Come along and discover why these No-Bake Chocolate Cashew Butter Bars deserve a spot in your recipe collection.
What are No-Bake Chocolate Cashew Butter Bars?
Ah, the impressive No-Bake Chocolate Cashew Butter Bars! Have you ever wondered how something can be both a bar and a dessert at the same time? Well, here’s your answer! This delightful treat combines the creamy goodness of cashew butter with the irresistible allure of chocolate in a bar form, perfect for munching on any time of day. A classic saying goes, “the way to a man’s heart is through his stomach,” and these bars are undoubtedly a gateway to anyone’s sweet side! So why not have fun with your cooking? Grab your ingredients and let’s dive into making these bars together!
Why You’ll Love This No-Bake Chocolate Cashew Butter Bars:
There are so many reasons to adore these No-Bake Chocolate Cashew Butter Bars! First, let’s talk about the star star of the show—the rich chocolate flavor. When you take your first bite, the smooth chocolate melds perfectly with the creamy cashew butter to create a blissful taste explosion. Who wouldn’t love that?
Secondly, making these bars at home can save you money compared to purchasing pre-made treats from the store, but with a taste that’s premium! You’ll find that most ingredients are easily accessible and affordable, making this a win-win.
Lastly, no-bake recipes are often topped with a myriad of options, and you’re free to get creative! Consider adding nuts, seeds, or dried fruits to the mix for extra texture and flavor. If you’re a fan of my homemade Granola Bites, you’ll definitely enjoy these bars too! Grab your apron, and let’s make some sweet magic happen!
How to Make No-Bake Chocolate Cashew Butter Bars:
Quick Overview
These bars are simple, delicious, and ready in no time—perfect for busy days! Made with easy-to-find ingredients, you’ll spend less than 20 minutes prepping them. Just mix, press, and refrigerate, and you end up with a decadent treat that everyone will love!
Key Ingredients for No-Bake Chocolate Cashew Butter Bars:
- 1 cup cashew butter
- 1/2 cup maple syrup (or honey for a non-vegan option)
- 1 teaspoon vanilla extract
- 2 cups rolled oats
- 1/2 cup cocoa powder
- A pinch of salt
- Optional toppings: chopped nuts, chocolate chips, or coconut shavings
Step-by-Step Instructions:
- Prepare Your Pan: Line an 8×8-inch square pan with parchment paper for easy removal.
- Mix Wet Ingredients: In a large bowl, combine the cashew butter, maple syrup, and vanilla extract. Stir until smooth and well-blended.
- Add Dry Ingredients: Gradually add the rolled oats, cocoa powder, and salt to the wet mixture. Mix until thoroughly combined.
- Transfer to Pan: Pour the mixture into the prepared pan and press it down evenly with the back of a spoon or your hands.
- Chill in the Fridge: Place the pan in the refrigerator for at least 2 hours to let the bars set firm.
- Cut and Serve: Once chilled, lift the bars from the pan using the parchment paper and cut them into squares or rectangles. Enjoy your creation!
What to Serve No-Bake Chocolate Cashew Butter Bars With:
These delicious bars can stand alone, but if you want to create a delightful dessert platter, consider pairing them with fresh fruit like strawberries or raspberries for a refreshing contrast. A dollop of whipped cream or a scoop of vanilla ice cream on the side complements the rich flavors beautifully! And of course, a cup of coffee or herbal tea makes for a perfect pairing, balancing out the sweetness of the bars.
Top Tips for Perfecting No-Bake Chocolate Cashew Butter Bars:
- Ingredient Substitutions: You can substitute almond or peanut butter if you prefer! Just ensure they’re smooth for the best consistency.
- Texture Tip: For an added crunch, consider mixing in some chopped nuts or granola to the base before pressing it into the pan.
- Stick to Measurements: Make sure to measure your ingredients accurately. This can affect the texture, especially the oats and cocoa powder.
- Add More Flavor: Don’t hesitate to throw in a pinch of cinnamon or a few splashes of espresso powder to elevate the chocolate flavor!
Storing and Reheating Tips:
These No-Bake Chocolate Cashew Butter Bars can be stored in an airtight container in the refrigerator for up to a week, making them an excellent snack option for busy days. If you have leftovers, you can also freeze these bars! Simply wrap them individually in parchment paper and store them in a freezer-safe container, where they’ll stay fresh for up to three months. When you’re ready to enjoy, just let them thaw in the fridge or at room temperature, and they will taste just as delightful as when you first made them!
So, what are you waiting for? Grab your ingredients and embark on this sweet adventure today with No-Bake Chocolate Cashew Butter Bars! Your taste buds will thank you!

No-Bake Chocolate Cashew Butter Bars
Ingredients
Method
- Line an 8x8-inch square pan with parchment paper for easy removal.
- In a large bowl, combine the cashew butter, maple syrup, and vanilla extract. Stir until smooth and well-blended.
- Gradually add the rolled oats, cocoa powder, and salt to the wet mixture. Mix until thoroughly combined.
- Pour the mixture into the prepared pan and press it down evenly with the back of a spoon or your hands.
- Place the pan in the refrigerator for at least 2 hours to let the bars set firm.
- Once chilled, lift the bars from the pan using the parchment paper and cut them into squares or rectangles.
Leave a Reply