
Mini Cheesecakes: A Bite-Sized Delight!
Are you ready to indulge in a creamy, dreamy, and oh-so-decadent dessert that will have your taste buds dancing? Say hello to Mini Cheesecakes! These little wonders are not only delightful in flavor but also come with the charming ability to bring smiles to everyone’s faces! Perfect for parties, family gatherings, or simply to satisfy your sweet tooth, mini cheesecakes are the ultimate crowd-pleaser.
Did you know that cheesecake has been around since ancient Greece? That’s right! It’s not just a modern dessert but has roots deep in culinary history. The beauty of mini cheesecakes lies in their simplicity; you can whip them up in no time, and the best part? They are family-friendly and fun to personalize! Imagine adding your favorite toppings—maybe a luscious caramel drizzle or a handful of fresh berries? If you love desserts as much as I do, you might also want to check out our sumptuous Classic Chocolate Cake recipe, which never fails to impress. Now let’s dive into making these delightful mini cheesecakes!
What are Mini Cheesecakes?
So, what exactly is the deal with mini cheesecakes? Well, imagine the silky texture of a classic cheesecake, but in adorable, individual-sized portions! They’re not just cute; they’re also incredibly versatile. Some might argue that they’re a gourmet treat disguised as a casual dessert, and I have to agree! Who wouldn’t want to indulge in these little bites of heaven that are perfect for any occasion? Speaking of which, have you ever wondered why they’re called cheesecakes? It’s because—wait for it—the way to a man’s heart is through his stomach, and these cheesecakes sure know how to win over hearts! So why not give these mini delights a try? You won’t regret it!
Why You’ll Love This Mini Cheesecake:
There are so many reasons to fall head over heels for these Mini Cheesecakes! First off, their creamy texture is just heavenly. Each bite melts in your mouth, delivering a rich combination of flavors that will have you coming back for more. Secondly, making them at home is not only fun but also saves you a trip to the bakery, meaning you can whip up a batch without breaking the bank! Imagine impressing friends and family with a homemade cheesecake that looks like it came straight from a fancy restaurant!
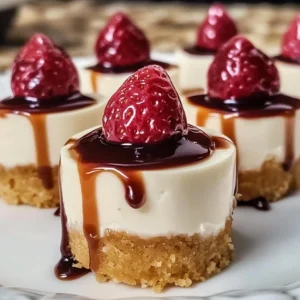
Let’s not forget the toppings! You can customize these mini cheesecakes to your heart’s content. Drizzle them with warm caramel, slather them in chocolate sauce, or top them with crunchy pecans. The possibilities are endless! If you love desserts that are as tasty as they are adorable, then these mini cheesecakes are perfect for you. Ready to get started? Let’s go!
How to Make Mini Cheesecakes:
Quick Overview
Making Mini Cheesecakes is super easy and requires only a few simple steps. With a bake time of about 25 minutes and a little bit of chilling time afterward, you’ll have an elegant dessert ready in no time. Trust me, they are as satisfying to make as they are to eat!
Key Ingredients for Mini Cheesecakes:
- For the Crust:
- 3/4 cup graham cracker crumbs or cookies you like
- 1 tablespoon granulated sugar
- 3 tablespoons unsalted butter, melted
- For the Cheesecake:
- 16 oz cream cheese, softened
- 1/2 cup light brown sugar
- 1/4 cup sour cream
- 2 tablespoons all-purpose flour
- 2 large eggs
- For the Topping (optional):
- Caramel sauce
- Chocolate syrup
- Pecan halves
Step-by-Step Instructions:
- Preheat Oven: Start by preheating your oven to 350°F (175°C). This is a crucial step for baking those delightful cheesecakes to perfection.
- Prepare the Pan: Place a large rimmed sheet pan on the bottom oven rack and fill it halfway with water to create steam. This will help keep your cheesecakes moist while baking.
- Make the Crust: In a small bowl, combine the graham cracker crumbs, granulated sugar, and melted butter until they come together. Distribute the mixture evenly into lined muffin tins, pressing down firmly to form the crust.
- Prepare Cheesecake Filling: In a large bowl, beat softened cream cheese and light brown sugar until smooth and creamy. Next, add sour cream and flour, mixing well. Finally, incorporate the eggs one at a time, ensuring you don’t overmix.
- Fill the Cups: Spoon the cheesecake batter into each cupcake liner, filling them almost to the top.
- Bake: Place the muffin tin on the oven rack above the pan of steaming water and bake for about 25 minutes, or until the cheesecakes are set.
- Cooling Time: Once baked, remove them from the oven and let them cool in the tin for about 15 minutes. Then, transfer them to a wire rack to cool completely. Finally, refrigerate for at least 4 hours or overnight until thoroughly chilled.
- Add Toppings: When ready to serve, drizzle with caramel and chocolate syrup, and consider adding whipped cream and pecan halves for an extra crunch!
What to Serve Mini Cheesecakes With:
Mini Cheesecakes are versatile and pair excellently with a variety of dishes. You can serve them alongside fresh fruit, such as strawberries or raspberries, which will add a refreshing contrast to the creamy texture. Additionally, consider offering a scoop of vanilla ice cream or a side of whipped cream for an extra treat. For drinks, a cup of rich coffee or sweet tea would complement your mini cheesecakes perfectly!
Top Tips for Perfecting Mini Cheesecakes:
To ensure your Mini Cheesecakes turn out perfect every time, follow these handy tips:
- Don’t Overmix: When adding the eggs, mix until just combined to keep the texture light and fluffy.
- Chill Well: Letting your cheesecakes cool in the refrigerator is essential for that luscious, creamy texture.
- Experiment with Flavors: Don’t hesitate to add flavors like lemon zest or vanilla extract for a unique twist!
- Use Quality Ingredients: Good quality cream cheese and fresh eggs will enhance the flavor significantly.
Storing and Reheating Tips:
If you happen to have any leftovers (which is rare when these mini treats are around!), you can store them in an airtight container in the refrigerator for up to 3 days. They also freeze beautifully! Just make sure to wrap them tightly with plastic wrap and store in a freezer-safe container for up to a month. When you’re ready to enjoy them again, thaw the mini cheesecakes in the fridge overnight and serve chilled for the best taste experience.
And there you have it—your guide to making the most delightful Mini Cheesecakes! I can’t wait for you to try this easy and satisfying recipe. Remember, great desserts are all about sharing! So gather your friends and family around, and indulge in these little bites of joy together!

Mini Cheesecakes: A Bite-Sized Delight!
Ingredients
Method
- Preheat Oven: Start by preheating your oven to 350°F (175°C). This is a crucial step for baking those delightful cheesecakes to perfection.
- Prepare the Pan: Place a large rimmed sheet pan on the bottom oven rack and fill it halfway with water to create steam. This will help keep your cheesecakes moist while baking.
- Make the Crust: In a small bowl, combine the graham cracker crumbs, granulated sugar, and melted butter until they come together. Distribute the mixture evenly into lined muffin tins, pressing down firmly to form the crust.
- Prepare Cheesecake Filling: In a large bowl, beat softened cream cheese and light brown sugar until smooth and creamy. Next, add sour cream and flour, mixing well. Finally, incorporate the eggs one at a time, ensuring you don’t overmix.
- Fill the Cups: Spoon the cheesecake batter into each cupcake liner, filling them almost to the top.
- Bake: Place the muffin tin on the oven rack above the pan of steaming water and bake for about 25 minutes, or until the cheesecakes are set.
- Cooling Time: Once baked, remove them from the oven and let them cool in the tin for about 15 minutes. Then, transfer them to a wire rack to cool completely. Finally, refrigerate for at least 4 hours or overnight until thoroughly chilled.
- Add Toppings: When ready to serve, drizzle with caramel and chocolate syrup, and consider adding whipped cream and pecan halves for an extra crunch!
Leave a Reply