
Drumstick Ice Cream Cake: A Delicious Delight for All Ages!
Are you ready to indulge in a dessert that brings together the best of both worlds? Introducing the Drumstick Ice Cream Cake – a delightful combination of creamy ice cream, crunchy cones, and delicious toppings that will have your taste buds dancing! This cake not only looks stunning but also has the power to turn any ordinary day into a celebration. Picture this: on a warm sunny afternoon, you slice into a cake that mirrors your favorite ice cream treat, revealing layers of mouthwatering flavors. What’s more, it’s super simple to make, making it a fantastic choice for family gatherings or a weekend treat with the kids.
Like the beloved no-bake cheesecake on our blog, which whips together creamy layers without the fuss of baking, this Drumstick Ice Cream Cake is all about simple steps and incredible flavors. With a prep time that won’t steal your afternoon, your loved ones will be asking for seconds when they taste this blissful creation. So grab your spatula and let’s get ready to dive into this heavenly dessert!
What is Drumstick Ice Cream Cake?
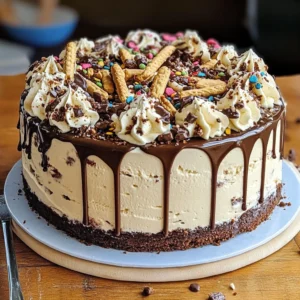
You might be wondering—what exactly is a Drumstick Ice Cream Cake? Is it a cake? Is it ice cream? Or maybe a delicious hybrid? The truth is, it’s all of the above and more! Inspired by the well-known Drumstick ice cream cones, this delightful cake layers soft ice cream between crunchy cake layers, topped with everyone’s favorite hot fudge and nuts. Did you ever hear that “the way to a man’s heart is through his stomach?” Well, let me tell you, this cake would win anyone’s heart! Imagine biting into a slice and being welcomed with creamy, dreamy ice cream that coats your palate like a soft embrace. Whip this up, and I bet it’ll become your go-to dessert, too!
Why You’ll Love This Drumstick Ice Cream Cake
If you’re still on the fence about trying this Drumstick Ice Cream Cake, let me give you a little nudge! First, the highlight of this dish is undeniably the creamy ice cream layers fused with crunchy cones—each bite brings an explosion of flavors and textures! Imagine dragging your spoon through smooth vanilla ice cream adorned with bits of waffle cone; it’s ice cream bliss at its finest.
Second, let’s talk savings—why pay a premium for a scoop at the ice cream shop when you can make this decadent dessert right at home? You can customize it with your favorite flavors, avoiding the high price tag while delighting your friends and family with your homemade creation.
Finally, don’t forget the toppings! With an array of choices, from chocolate sauce to crushed nuts, each bite can be a new experience. If you love this cake, you might also enjoy our chocolate lava cake, which melts in your mouth and is a fantastic alternative for chocolate lovers. So, gather your ingredients and whip up this masterpiece; I promise you won’t regret it!
How to Make Drumstick Ice Cream Cake
Quick Overview
Creating this Drumstick Ice Cream Cake is a breeze! With minimal effort, you’ll achieve a scrumptious dessert that’s an absolute crowd-pleaser. It blends the convenience of ice cream and the delight of cake in just 30 minutes (plus some chilling time in the freezer). You’ll soon discover that it’s the perfect dessert for potlucks, parties, or just a fun family treat!
Key Ingredients for Drumstick Ice Cream Cake
To make your very own Drumstick Ice Cream Cake, you’ll need the following ingredients:
- 1 box of cake mix (plus eggs, water, and oil as per the package)
- 1 pint of vanilla ice cream
- 1 cup of crushed waffle cones
- ½ cup of hot fudge sauce
- ½ cup of chopped nuts (like peanuts or walnuts)
- Whipped cream for topping
- Chocolate drizzle for decoration (optional)
- Additional sprinkles for flair (optional)
Step-by-Step Instructions:
- Prepare the Cake: Follow the instructions on the cake mix box to bake your cake. Allow it to cool completely once finished.
- Gather the Ice Cream: Let your vanilla ice cream sit at room temperature for about 10 minutes, making it easier to spread.
- Layer the Ice Cream: Once your cake is cooled, cut it in half horizontally, and place one layer back in the pan. Spread an even layer of softened vanilla ice cream on top.
- Add Crunch: Sprinkle crushed waffle cones and drizzle with hot fudge sauce over the ice cream layer.
- Top and Chill: Place the second cake layer back on top, pressing down gently. Cover the entire cake with a layer of whipped cream, and freeze for at least 4 hours, or until firm.
- Final Touches: Before serving, drizzle with hot fudge, add chopped nuts, and any other creative toppings you desire!
What to Serve Drumstick Ice Cream Cake With
When it comes to pairing, this Drumstick Ice Cream Cake is versatile! Consider serving it alongside fresh fruit like strawberries or raspberries for a refreshing contrast. A scoop of your favorite ice cream would also enhance the experience, especially if you want to go all out! For drinks, a chilled glass of lemonade or iced tea can be refreshing, perfectly complementing the sweetness of the cake.
Top Tips for Perfecting Drumstick Ice Cream Cake
To ensure your Drumstick Ice Cream Cake is a hit, keep these tips in mind:
- Use High-Quality Ice Cream: The better your ice cream, the tastier the cake will be! Opt for premium brands with rich flavors.
- Experiment with Flavors: Don’t be afraid to use different ice cream flavors—chocolate, strawberry, or even mint chocolate can give exciting variations!
- Watch the Freezing Time: Make sure to let your cake freeze long enough to set – a minimum of 4 hours is ideal.
Storing and Reheating Tips
If by chance you have leftovers (although I doubt it!), you can store the Drumstick Ice Cream Cake in the freezer for up to a month. Just make sure to cover it tightly with plastic wrap to avoid freezer burn. If you wish to enjoy it again, simply slice off a piece and let it sit at room temperature for a few minutes to soften before indulging.
Now that you’re all set with the recipe, it’s time to gather your ingredients and get into the kitchen! You won’t believe how quickly you can whip up this sensational Drumstick Ice Cream Cake, and I can’t wait for you to share it with your loved ones. Trust me, every bite will make you smile!

Drumstick Ice Cream Cake: A Delicious Delight for All Ages!
Ingredients
Method
- Prepare the Cake: Follow the instructions on the cake mix box to bake your cake. Allow it to cool completely once finished.
- Gather the Ice Cream: Let your vanilla ice cream sit at room temperature for about 10 minutes, making it easier to spread.
- Layer the Ice Cream: Once your cake is cooled, cut it in half horizontally, and place one layer back in the pan. Spread an even layer of softened vanilla ice cream on top.
- Add Crunch: Sprinkle crushed waffle cones and drizzle with hot fudge sauce over the ice cream layer.
- Top and Chill: Place the second cake layer back on top, pressing down gently. Cover the entire cake with a layer of whipped cream, and freeze for at least 4 hours, or until firm.
- Final Touches: Before serving, drizzle with hot fudge, add chopped nuts, and any other creative toppings you desire!
Leave a Reply