
Published: · Updated:
Imagine walking into a cozy kitchen filled with the delightful aroma of freshly baked banana bread, a treat that evokes memories of home and warmth. This Cassava Flour Banana Bread isn’t just your ordinary loaf; it’s a gluten-free, easy-to-make delight that everyone in the family will adore! The softness and moistness of this bread, combined with the natural sweetness of ripe bananas, create a comforting, inviting snack or breakfast option. Fun fact: by using cassava flour, we’re not only making it suitable for gluten-sensitive folks, but we’re also adding a unique texture that sets it apart from conventional banana bread! It’s the perfect companion to your morning coffee or an afternoon tea.
If you’ve ever made the classic banana bread, you know how effortless and satisfying it is to whip up. This cassava version is just as simple but with a twist that makes it even more special. Plus, who doesn’t love a recipe that you can throw together in no time at all?
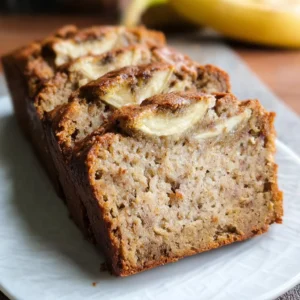
Meet Cassava Flour Banana Bread
“Cassava Flour Banana Bread,” you say? What makes it so unique, you ask? Well, it all starts with the star ingredient: cassava flour, which whispers tropical goodness and health benefits with every bite! Ripe bananas lend their sweetness, and together, they form an absolutely irresistible combination. Legend has it that this recipe originates from the desire to make a healthier alternative to traditional banana bread, and oh boy, did it hit the bullseye! So, why not give it a whirl? You might just create the next family favorite!
Why This Cassava Flour Banana Bread Works
- Flavorful Delight: This banana bread is not only soft and fluffy, but it also boasts a rich banana flavor that’s just the right amount of sweetness. Whether enjoyed warm or at room temperature, this bread promises flavor in every slice!
- Cost-Effective: Making Cassava Flour Banana Bread at home is wallet-friendly, especially when you consider the price of store-bought gluten-free options. Plus, it uses easily accessible ingredients, making it a practical choice for any kitchen.
- Versatile Toppings: The beauty of this bread is that it can be enjoyed plain or topped with your favorite spreads, such as almond butter or homemade jam. You can even get adventurous by adding nuts or chocolate chips for an extra flavor boost. If you love zucchini bread, you’ll be thrilled with this delicious banana bread alternative.
Are you ready to indulge in this delightful recipe just waiting to happen in your kitchen? Let’s get to the fun part!
Cassava Flour Banana Bread, Step by Step
In a Nutshell
This recipe is the epitome of simplicity and deliciousness! With just a few basic ingredients, your time from mixing to tasting is minimal. In about an hour, you’ll have a sumptuous loaf that’s perfect for breakfast or an afternoon snack.
Key Ingredients for Cassava Flour Banana Bread:
- 3 ripe bananas (mashed)
- 2 cups cassava flour
- 1/2 cup coconut oil (melted) or butter
- 1/2 cup honey or maple syrup
- 3 eggs
- 1 tsp baking soda
- 1/4 tsp salt
- 1 tsp vanilla extract
- Optional: 1/2 cup chopped nuts or chocolate chips
Instructions
- Preheat the Oven: Begin by preheating your oven to 350°F (175°C). Grease a loaf pan or line it with parchment paper.
- Mix Wet Ingredients: In a mixing bowl, mash the ripe bananas until smooth. Add the melted coconut oil or butter, honey or maple syrup, eggs, and vanilla extract. Stir until well combined.
- Combine Dry Ingredients: In a separate bowl, whisk together the cassava flour, baking soda, and salt.
- Mix Everything: Gradually add the dry ingredient mixture into the wet ingredients, stirring gently until just combined. If you’re feeling adventurous, fold in the optional nuts or chocolate chips at this stage.
- Pour and Bake: Pour the batter into the prepared loaf pan, smoothing the top if needed. Bake for 45-55 minutes, or until golden brown and a toothpick inserted in the center comes out clean.
- Cool and Serve: Let the bread cool in the pan for about 10 minutes before transferring to a wire rack to cool completely. Slice and enjoy your delicious creation!
Serving Ideas for Cassava Flour Banana Bread
Looking for some pairings? How about a slice topped with a dollop of Greek yogurt or nut butter for added creaminess? You could also enjoy it with a cup of your favorite tea or a scoop of ice cream for an indulgent treat. Fruit salads or yogurt bowls are great side options that complement the banana flavor and bring color to your plate!
Cassava Flour Banana Bread, Done Right
- Ensure Ripe Bananas: The riper the bananas, the sweeter your bread will be. Overripe bananas are ideal for this recipe!
- Don’t Overmix: When combining the ingredients, mix just until combined to avoid a dense loaf.
- Check Doneness Early: Ovens can vary, so start checking for doneness a few minutes early.
Planning Ahead and Storing
For storage, wrap the cooled bread in foil or place it in an airtight container at room temperature for up to 3 days. You can also refrigerate it to extend its freshness for about a week. For longer storage, slice the bread, wrap portions in plastic wrap, and freeze for up to 3 months. To reheat, simply pop a slice in the toaster or warm it in the microwave for a few seconds.
In conclusion, your homemade Cassava Flour Banana Bread is not just a recipe; it’s a delightful experience. Enjoy every bite and share proudly with your family and friends! 🍌🍞✨

Cassava Flour Banana Bread
Ingredients
Method
- Preheat your oven to 350°F (175°C). Grease a loaf pan or line it with parchment paper.
- In a mixing bowl, mash the ripe bananas until smooth. Add melted coconut oil or butter, honey or maple syrup, eggs, and vanilla extract. Stir until well combined.
- In a separate bowl, whisk together the cassava flour, baking soda, and salt.
- Gradually add the dry ingredient mixture into the wet ingredients, stirring gently until just combined. If you’re feeling adventurous, fold in the optional nuts or chocolate chips.
- Pour the batter into the prepared loaf pan, smoothing the top if needed.
- Bake for 45-55 minutes, or until golden brown and a toothpick inserted in the center comes out clean.
- Let the bread cool in the pan for about 10 minutes before transferring to a wire rack to cool completely. Slice and enjoy!
Leave a Reply