
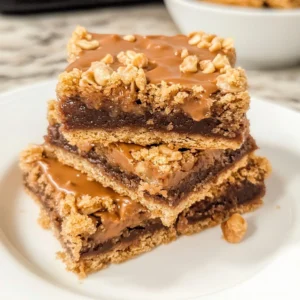
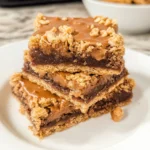
Carmelitas: A Sweet Delight You Can’t Resist!
If you’re searching for a dessert that combines the richness of caramel with the gooey goodness of chocolate, look no further than Carmelitas! This decadent treat is a harmonious blend of buttery, chewy oatmeal cookie layers sandwiching a luscious caramel filling, accented with melty chocolate chips. What’s not to love? The best part is that this dish is incredibly simple to whip up, making it a perfect choice for busy weeknight desserts or a showstopper for your next gathering. Fun fact: many say that the name “Carmelitas” refers to how these tasty bars evoke sweet memories and feelings of warmth—like hugging a loved one after a long day. If you’re a fan of treats like chocolate chip cookies or brownies, you’ll want to keep reading! Grab your baking pans; it’s time to make some Carmelitas!
What are Carmelitas?
So, what’s in a name? Carmelitas might sound fancy, but it really just means divine layers of delight! Curious about how it got its charming title? This sweet treat combines caramel and oats, making it a uniquely comforting dessert that’s impossible to eat just one. Legend has it that these bars were named for their charmingly sweet flavor, reminiscent of delightful evenings spent enjoying treats with friends. They say the way to a man’s heart is through his stomach, right? Well, sharing a plate of Carmelitas is sure to win over anyone’s taste buds! So, are you ready for a scoop of caramel-filled bliss? Let’s get started on this irresistible recipe!
Why You’ll Love Carmelitas:
- Irresistible Combination: The best part about Carmelitas is their unbeatable blend of flavors. With layers of oatmeal cookie, gooey caramel, and rich chocolate, each bite offers a delightful flavor explosion. You may find yourself wanting to make them again and again!
- Easy on the Wallet: Making caramel bars at home is not only scrumptious but also easy on the wallet! With simple pantry staples, you’ll save money compared to buying fancy desserts at bakeries, enabling you to indulge without the guilt of overspending.
- Customizable Toppings: Whether you prefer chopped nuts for added crunch, a sprinkle of sea salt for extra flavor, or fresh fruit to lighten it up, the options for toppings are endless. Compared to traditional chocolate chip cookies, this topping versatility opens up a whole new world of dessert magic!
So, are you ready to create your very own batch of Carmelitas? Let’s explore how this delicious treat comes together!
How to Make Carmelitas:
Quick Overview
Making Carmelitas is a breeze! With just a few ingredients and simple steps, you’ll have a delicious dessert in about 30 minutes of prep time. The combination of textures—from chewy oats to gooey caramel—is guaranteed to satisfy your cravings!
Key Ingredients for Carmelitas:
- 1 cup (2 sticks) unsalted butter, softened
- 1 cup brown sugar, packed
- 1 cup granulated sugar
- 2 cups all-purpose flour
- 1 cup rolled oats
- 1 teaspoon baking soda
- 1/2 teaspoon salt
- 1 cup chocolate chips
- 1 cup caramel sauce
Step-by-Step Instructions:
- Preheat the Oven: Start by preheating your oven to 350°F (175°C). Grease a 9×13 inch baking dish to prevent sticking.
- Cream the Butter and Sugars: In a large mixing bowl, cream together the softened butter, brown sugar, and granulated sugar until the mixture is smooth and creamy.
- Combine Dry Ingredients: Add the flour, rolled oats, baking soda, and salt into the mixture. Stir until all ingredients are well combined and form a dough.
- Press Dough into Baking Dish: Take about half of the dough and press it evenly into the bottom of the greased baking dish to create your base layer.
- Add Chocolate Chips and Caramel: Sprinkle the chocolate chips evenly over the base, then drizzle the caramel sauce over the chips.
- Top with Remaining Dough: Crumble the remaining dough over the caramel and chocolate layers. Don’t worry about making it perfect; some gaps are totally fine!
- Bake: Pop your dish into the oven and bake for 25-30 minutes, or until the top is beautifully golden brown. Your kitchen will smell heavenly!
- Cool and Cut: Allow the Carmelitas to cool before cutting them into squares. They’re a bit gooey when fresh out of the oven, so be patient—you’ll be rewarded for your wait!
What to Serve Carmelitas With:
Carmelitas are perfect on their own but feel free to elevate the experience by pairing them with a scoop of vanilla ice cream or a dollop of whipped cream. Serve alongside a warm cup of coffee for the ultimate dessert pairing or even with fresh berries to complement the richness. Consider matching them with a chocolate martini for a fun evening treat!
Top Tips for Perfecting Carmelitas:
- Use Fresh Ingredients: Always ensure your butter and baking powder are fresh for optimal flavor and texture.
- Don’t Overbake: Keep an eye on your Carmelitas while they’re baking. They should be slightly undercooked—not only does this keep them moist, but it enhances the gooey caramel center!
- Customize Ingredients: Feel free to swap out the chocolate chips for your favorite mix-ins or add nuts, dried fruit, or flavored extracts to switch things up.
Storing and Reheating Tips:
To store your delicious Carmelitas, simply keep them in an airtight container at room temperature for up to 3 days. If you’d like to keep them longer, refrigerate them for up to a week, or you can freeze them for up to 3 months. To reheat, pop them in the microwave for about 10-15 seconds or until warmed through—this will revive that irresistible gooeyness that makes them so special!
Now that you have all the information needed to whip up a delicious batch of Carmelitas, it’s time to put on your apron and get baking! Your friends and family will be thrilled to enjoy this delightful treat. Happy baking!
Carmelitas
Ingredients
Method
- Preheat your oven to 350°F (175°C) and grease a 9×13 inch baking dish.
- In a large mixing bowl, cream together the softened butter, brown sugar, and granulated sugar until the mixture is smooth and creamy.
- Add the flour, rolled oats, baking soda, and salt into the mixture. Stir until all ingredients are well combined and form a dough.
- Take about half of the dough and press it evenly into the bottom of the greased baking dish to create your base layer.
- Sprinkle the chocolate chips evenly over the base, then drizzle the caramel sauce over the chips.
- Crumble the remaining dough over the caramel and chocolate layers. Don’t worry about making it perfect; some gaps are totally fine!
- Pop your dish into the oven and bake for 25-30 minutes, or until the top is beautifully golden brown.
- Allow the Carmelitas to cool before cutting them into squares.
Leave a Reply