
A Delectable Delight Awaits: Apple Music Cake
Are you ready to treat your taste buds to a delightful symphony of flavors? Introducing the Apple Music Cake, a sensational dessert that harmoniously combines the flavors of sweet apple juice, fluffy biscuit layers, and creamy goodness. This cake is not just a feast for the eyes; it’s a comforting slice of nostalgia, perfect for family gatherings or a cheerful afternoon tea. Did you know that the origins of such apple-based treats can sometimes date back centuries across different cultures? With its simple preparation and quick assembly, this cake stands out as a family-friendly favorite. Unlike other complicated desserts found on our blog, such as the intricate Croissant Baked Alaska, Apple Music Cake offers ease and accessibility—all while being utterly delicious! There’s no better time than now to whip up this delightful treat, so let’s dive into this extraordinary recipe!

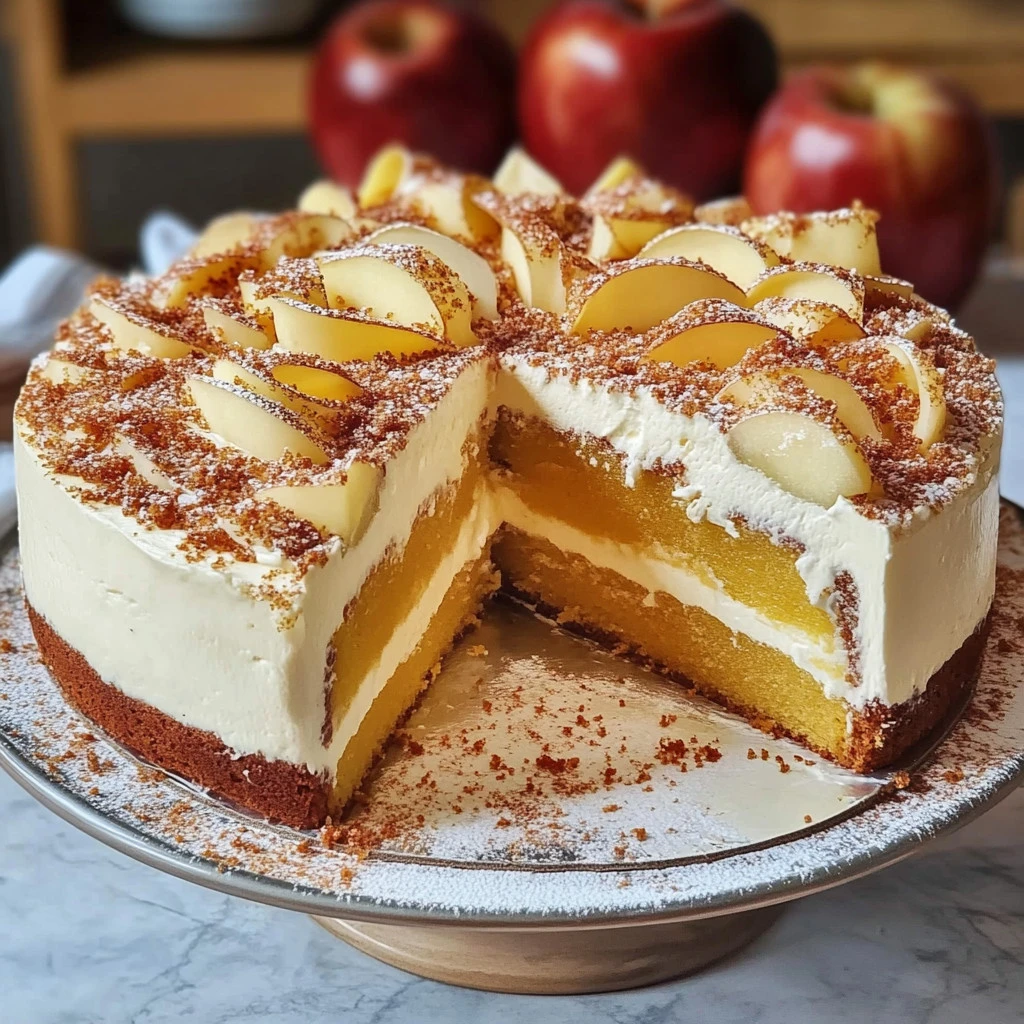
What is Apple Music Cake?
So, what exactly is this charmingly named Apple Music Cake? Well, it’s more than just a mouthful of a title! Imagine a cake that dances on your palate with a melodious blend of fluffy biscuit and luscious apple filling topped off with a rich cream. But why call it “Music”? Perhaps it’s because every bite sings with flavor, or maybe it’s a toast to the joy of baking in the kitchen, which is a music of its own! As they say, “the way to a man’s heart is through his stomach,” and nothing captures that sentiment quite like a moist, inviting cake that’s perfect for sharing. Grab your mixing bowls, and let’s make some sweet music together with this extraordinary recipe!
Why You’ll Love This Apple Music Cake
There are three compelling reasons why the Apple Music Cake should grace your dessert table this weekend. Firstly, the main highlight of this recipe lies in its light texture and the tantalizing experience of biting into a layer of fluffy biscuit coupled with a burst of delightful apple filling. Secondly, making this cake at home is cost-effective, allowing you to wow your guests without breaking the bank. Plus, you can customize the sweetness to your preference! Lastly, the beautiful layers come together wonderfully with the creamy topping, elevating the whole experience. If you love classic desserts, you might also want to explore our Vanilla Bean Pudding recipe, which shares that comforting appeal of home-cooked goodness. So, get your apron on and let’s create your very own Apple Music Cake!
How to Make Apple Music Cake
Quick Overview
Creating an Apple Music Cake is as easy as pie—err, cake! It’s a straightforward recipe that highlights the harmonious blend of the biscuit and apple filling, featuring a delightful creamy topping that brings it all together. The best part? This amazing treat can be made in just under an hour!
Key Ingredients for Apple Music Cake:
- 3 eggs
- 120 g sugar
- 2 tablespoons hot water
- 100 g wheat flour (Type 405)
- 30 g starch
- 1 teaspoon baking powder
- 500 ml apple juice
- 2 tablespoons sugar (for filling)
- 2 packs vanilla pudding powder
- 400 g apple sauce
- 200 g cream
- 2 packs cream stiffener
- 1 pack vanilla sugar
- 200 g sour cream
- 1 teaspoon cocoa powder
Step-by-Step Instructions:
- Preheat the Oven: Begin by preheating your oven to 180 degrees Celsius (or 160 degrees Celsius for circulating air). Line a 26 cm springform pan with baking paper.
- Prepare the Biscuit Batter: In a mixing bowl, beat the eggs and sugar together until light and frothy. Add the hot water and mix. Sift in the wheat flour, starch, and baking powder, folding gently until everything is well incorporated.
- Bake the Biscuit: Pour the biscuit mixture into the prepared pan, smoothing it out nicely. Bake in the oven for approximately 25 minutes or until golden brown. Once baked, let it cool completely before removing it from the springform pan.
- Make the Apple Filling: While the biscuit is cooling, bring two-thirds of the apple juice to a boil in a saucepan. In a separate bowl, combine the remaining apple juice with the sugar and pudding powder. Once the apple juice is boiling, stir in the pudding mixture and cook for about 2 minutes. Remove it from heat and let it cool slightly before mixing in the apple sauce.
- Prepare the Cream Topping: In another bowl, whip together the cream, cream stiffener, vanilla sugar, and sour cream until smooth. Add the cocoa powder for a touch of flavor.
- Assemble the Cake: Once the biscuit layer has completely cooled, place it on a serving platter, enclosing it with a cake ring. Pour the apple filling over the biscuit layer and allow it to set in the fridge for at least 30 minutes. Finally, top with the cream mixture before serving.
What to Serve Apple Music Cake With:
The Apple Music Cake pairs beautifully with a wide array of side dishes. Consider serving it alongside a scoop of vanilla ice cream for that delightful contrast. A warm cup of spiced chai or fresh coffee would also enhance its flavor. For a fruitier touch, a side of fresh berries or a light fruit salad can add a refreshing element to your dessert experience.
Top Tips for Perfecting Apple Music Cake:
- Ingredient Substitutions: If you’re looking for a healthier spin, try using whole wheat flour in place of regular flour. You could also substitute applesauce for sugar to reduce sweetness.
- Timing Adjustments: For the best results, ensure your eggs are at room temperature before whipping, as this helps them to incorporate more air for a fluffier biscuit.
- Common Mistakes to Avoid: Avoid overmixing the batter, as it can result in a dense texture instead of a light, airy cake. Keep an eye on the baking time, as ovens can vary.
Storing and Reheating Tips:
Leftover Apple Music Cake can be stored in an airtight container in the refrigerator for up to 4 days. If you wish to keep it longer, you can freeze individual slices wrapped in plastic wrap and foil for a maximum of 3 months. To reheat, simply put a slice in the microwave for 20-30 seconds or leave it out to thaw at room temperature. Enjoy your delicious music of apples and cream whenever the desire strikes!
Now that you have all the delectable details and instructions, it’s time to roll up your sleeves and indulge in the delightful creation that is Apple Music Cake! Happy baking!
A Delectable Delight Awaits: Apple Music Cake
Ingredients
Method
- Preheat the Oven: Begin by preheating your oven to 180 degrees Celsius (or 160 degrees Celsius for circulating air). Line a 26 cm springform pan with baking paper.
- Prepare the Biscuit Batter: In a mixing bowl, beat the eggs and sugar together until light and frothy. Add the hot water and mix. Sift in the wheat flour, starch, and baking powder, folding gently until everything is well incorporated.
- Bake the Biscuit: Pour the biscuit mixture into the prepared pan, smoothing it out nicely. Bake in the oven for approximately 25 minutes or until golden brown. Once baked, let it cool completely before removing it from the springform pan.
- Make the Apple Filling: While the biscuit is cooling, bring two-thirds of the apple juice to a boil in a saucepan. In a separate bowl, combine the remaining apple juice with the sugar and pudding powder. Once the apple juice is boiling, stir in the pudding mixture and cook for about 2 minutes. Remove it from heat and let it cool slightly before mixing in the apple sauce.
- Prepare the Cream Topping: In another bowl, whip together the cream, cream stiffener, vanilla sugar, and sour cream until smooth. Add the cocoa powder for a touch of flavor.
- Assemble the Cake: Once the biscuit layer has completely cooled, place it on a serving platter, enclosing it with a cake ring. Pour the apple filling over the biscuit layer and allow it to set in the fridge for at least 30 minutes. Finally, top with the cream mixture before serving.
Leave a Reply