
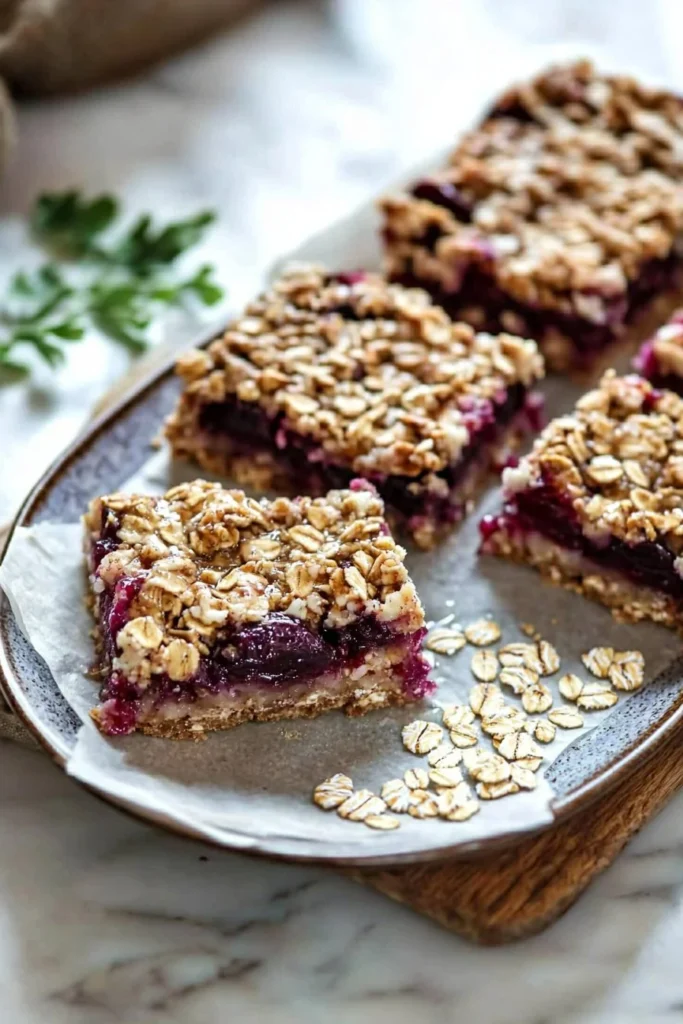
Ultimate Plum Breakfast Bars
Introduction
Are you on the hunt for a breakfast treat that perfectly balances chewy and crunchy textures with a burst of fruity flavor? Look no further than these Ultimate Plum Breakfast Bars! These delightful bars combine oats and fresh plums for a wholesome start to your day or a sweet afternoon snack. Once you’ve had a bite, you’ll understand why they can easily become a family favorite.
Fun fact: did you know that plums are not only delicious but packed with antioxidants? In my home, we often enjoy these bars during casual family gatherings, where questions like, “What’s in those amazing breakfast bars?” echo from the kitchen. If you love the comforting feeling of homemade treats, you’ll definitely want to compare these to our popular Apple Cinnamon Oatmeal Bars—both are equally delicious, yet this recipe brings a unique twist with plums that’s hard to resist. Let’s dive in, shall we?
What is Ultimate Plum Breakfast Bars?
You might be wondering where the name “Ultimate Plum Breakfast Bars” comes from. I mean, are there ordinary plum breakfast bars out there? Judging by how quickly they disappear in my household, these are anything but ordinary! They’re more like a warm hug in bar form, perfect for breakfast or a quick snack. A classic saying tells us that “the way to a man’s heart is through his stomach,” and these bars might just prove that right! Trust me; one taste will have everyone in your family begging for more.
So, why delay? Grab your ingredients and let’s make something delightful together!
Why You’ll Love This Ultimate Plum Breakfast Bars
There’s so much to love about Ultimate Plum Breakfast Bars. First, they highlight the sweet and tart flavor of fresh plums combined with the wholesome goodness of oats. The way the oats crisp up and intermingle with the fruit creates a delightful experience with every bite—think of them as the sophisticated cousin to traditional granola bars!
Another bonus? Cooking at home is a fantastic way to save money while indulging in delicious treats. Imagine the satisfaction of biting into a homemade bar versus store-bought! Plus, you can customize them with tantalizing toppings—think nuts, seeds, or even a dollop of yogurt. If you love the classic chewy granola bars, these ultimate bars will easily become your new favorite. Ready to whip up a batch? Let’s go!
How to Make Ultimate Plum Breakfast Bars
Quick Overview
These Ultimate Plum Breakfast Bars are easy to whip up and come together in about 15 minutes of prep time, with an additional 30 minutes for baking. The result is a warm and flavorful treat that will have you feeling satisfied and accomplished!
Ingredients
Here’s your shopping list for these wholesome breakfast bars:
- 2 cups rolled oats
- 1 cup all-purpose flour
- 1/2 cup brown sugar
- 1/2 cup granulated sugar
- 1/2 teaspoon salt
- 1 teaspoon baking powder
- 1/2 cup unsalted butter, melted
- 1 cup pitted plums, chopped
- 1/4 cup honey or maple syrup (optional)
- 1 teaspoon vanilla extract
Make sure to grab the freshest plums you can find for the best flavor!
Step-by-Step Instructions
- Preheat the Oven: Start by preheating your oven to 350°F (175°C). Line an 8×8-inch baking pan with parchment paper for easy removal.
- Mix the Dry Ingredients: In a large bowl, combine the rolled oats, all-purpose flour, brown sugar, granulated sugar, salt, and baking powder. Stir until well mixed.
- Add the Wet Ingredients: Make a well in the center of the dry mixture and pour in the melted butter, honey (if using), and vanilla extract. Mix until fully combined. The mixture should be slightly crumbly yet hold together when pressed.
- Incorporate the Plums: Gently fold in the chopped plums, ensuring they are evenly distributed throughout the mixture.
- Transfer to the Pan: Pour the mixture into the prepared baking pan. Press down firmly with your hands or a spatula to create an even layer.
- Bake: Place the pan in the preheated oven and bake for approximately 30 minutes or until the edges turn golden brown and the top is set.
- Cool and Slice: Allow the bars to cool in the pan for about 10 minutes before lifting them out using the parchment paper. Cool completely on a wire rack. Once cooled, slice into squares or rectangles.
- Enjoy: These bars can be enjoyed warm or at room temperature. Great for breakfast or a snack!
Top Tips for Perfecting Ultimate Plum Breakfast Bars
- Substitutions: Feel free to use gluten-free oats to accommodate different dietary needs. You can also swap the all-purpose flour with almond flour for a nutty flavor.
- Timing: Avoid over-baking to maintain the bars’ chewy texture. Check them a couple of minutes before the recommended baking time.
- Storing: Keep in mind that moisture from the fruit can impact storage. Store them in an airtight container for up to a week at room temperature.
Storing and Reheating Tips
You can refrigerate Ultimate Plum Breakfast Bars to extend their shelf life to about 2 weeks. For longer storage, these bars freeze beautifully! Wrap them tightly in plastic wrap, then place them in an airtight container or freezer bag. They can last up to 3 months in the freezer.
When you’re ready to enjoy them again, simply thaw at room temperature or pop them in the microwave for a few seconds until warm. Enjoy the delightful texture and flavor as if they were just baked!
Now that you have all the details, it’s time to gather your ingredients and bring the warmth of Ultimate Plum Breakfast Bars into your kitchen. Happy baking!

Ultimate Plum Breakfast Bars
Ingredients
Method
- Preheat your oven to 350°F (175°C) and line an 8x8-inch baking pan with parchment paper.
- In a large bowl, mix the rolled oats, all-purpose flour, brown sugar, granulated sugar, salt, and baking powder until well combined.
- Make a well in the center of the dry mixture, pour in the melted butter, honey, and vanilla extract, and mix until fully combined.
- Gently fold in the chopped plums until evenly distributed.
- Pour the mixture into the prepared baking pan and press down firmly to create an even layer.
- Bake in the preheated oven for approximately 30 minutes or until the edges turn golden brown and the top is set.
- Allow the bars to cool in the pan for about 10 minutes before lifting them out using the parchment paper.
- Cool completely on a wire rack and then slice into squares or rectangles.
- Enjoy the bars warm or at room temperature as a breakfast or snack.
Leave a Reply