
A Tropical Treat to Satisfy Your Sweet Tooth!
Looking for a dessert that dances with flavor and brings a taste of paradise to your living room? Look no further than Pineapple Bliss Bars! These delightful treats combine the tropical sweetness of ripe pineapples with a creamy, buttery base that’s just too irresistible. Perfect for gatherings, potlucks, or simply indulging on a lazy afternoon, these bars are not just a dessert; they’re a mood booster!
Did you know that pineapple is not just delicious but is also packed with vitamins and minerals? This sweet fruit can remind you of sunny vacations and warm beach days. Plus, Pineapple Bliss Bars are surprisingly simple to make, allowing even the busiest of home cooks to whip up a batch in no time. If you love our favorite Coconut Macaroons from the blog, you’ll surely enjoy the tropical twist of these bars! So, put on your apron, and let’s dive into this recipe that promises smiles and happiness with every bite.

What are Pineapple Bliss Bars?
Just saying “Pineapple Bliss Bars” makes you want to dig in, doesn’t it? But what does the name actually mean? It’s a fun play on the main ingredient—pineapple—and the sheer joy you feel when you take that first bite. Picture this: a sunny day, a plate of these bars, and a refreshing drink in your hand. We all know that “the way to a man’s heart is through his stomach,” and with Pineapple Bliss Bars, you’re bound to make everyone’s heart (and taste buds!) sing. So why not treat yourself and your loved ones to this sweet slice of heaven?
Why You’ll Love These Pineapple Bliss Bars
When it comes to desserts, Pineapple Bliss Bars have it all! Here are three key reasons to whip up a batch:
- Tropical Flavor: The star ingredient, pineapple, delivers a burst of fruity goodness, making every bite feel like a mini-vacation in your mouth. The sweetness balances perfectly with the buttery crust, creating a harmonious flavor experience.
- Cost-Effective: Making Pineapple Bliss Bars at home is not only easy but also budget-friendly! With simple ingredients likely already on hand, you can impress your friends and family without breaking the bank.
- Versatile Toppings: Don’t forget the potential for delightful toppings! Drizzle some melted chocolate, or top them with whipped cream for an added touch. Each combination brings these bars to the next level, making them the perfect base for your creativity.
If you’re a fan of Lemon Bars, you’ll appreciate the tart and sweet elements in this tropical rendition. So why not give these blissful bars a go and elevate your dessert game?
How to Make Pineapple Bliss Bars
Quick Overview
Pineapple Bliss Bars are not only delicious but also surprisingly easy to make. With a prep time of just 15 minutes and a bake time of about 30 minutes, you can have these treats on your table before you know it. The combination of a rich, buttery crust paired with creamy pineapple filling sets this dessert apart—profiteroles, take a back seat!
Key Ingredients for Pineapple Bliss Bars
To make your very own Pineapple Bliss Bars, gather the following ingredients:
- 1 cup all-purpose flour
- 1/2 cup unsalted butter, melted
- 1/4 cup granulated sugar
- 1 cup crushed pineapple, drained
- 2 large eggs
- 1/2 cup granulated sugar (for the filling)
- 1 tsp vanilla extract
- 1/4 cup shredded coconut (optional)
- Powdered sugar (for dusting)
Step-by-Step Instructions:
- Preheat the Oven: Preheat your oven to 350°F (175°C) and grease an 8×8-inch baking pan.
- Make the Crust: In a medium bowl, blend the melted butter, flour, and 1/4 cup sugar until it forms a crumbly mixture. Press this evenly into the bottom of your prepared baking pan. Bake for 10–12 minutes or until lightly golden.
- Prepare the Filling: In another bowl, whisk together the eggs, 1/2 cup of sugar, crushed pineapple, and vanilla extract until smooth. If desired, fold in shredded coconut for extra texture and flavor!
- Combine and Bake: Pour the pineapple mixture over the baked crust. Return to the oven and bake for an additional 20–25 minutes, until the filling is set and the edges are lightly browned.
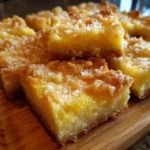
- Cool and Serve: Allow the bars to cool completely in the pan before cutting them into squares. Dust with powdered sugar before serving for a beautiful touch!
What to Serve Pineapple Bliss Bars With
Looking to enhance your Pineapple Bliss Bars experience? Pair them with a scoop of vanilla ice cream or a refreshing tropical fruit salad for a balanced dessert spread. A glass of iced tea or a fruity mocktail can complement the sweet flavors beautifully. These combinations not only elevate the dish but also create a lovely atmosphere for a summer gathering or a cozy family dessert night.
Top Tips for Perfecting Pineapple Bliss Bars
- Ingredient Substitutions: Don’t have crushed pineapple? Fresh pineapple or even canned chunks (well-drained) work perfectly as well! Consider using coconut milk for a dairy-free option.
- Baking Time: Keep an eye on the baking time; over-baking can lead to dry bars. You want just a hint of wiggle in the filling when you take them out!
- Common Mistakes: Ensure the crust is fully cooled before pouring the filling, or you might end up with a soggy bottom. Trust me, no one wants that!
Storing and Reheating Tips
Leftover Pineapple Bliss Bars? Lucky you! Store them in an airtight container in the refrigerator for up to 5 days. If you’re making them ahead of time, these bars also freeze beautifully, lasting up to 2 months. Just ensure they are well-wrapped to prevent freezer burn. To enjoy them later, simply thaw in the fridge overnight and serve chilled for the best flavor.
The journey of creating these Pineapple Bliss Bars brings joy to your kitchen, and even more joy to your taste buds. So why wait? Dive into this exotic treat that is as easy to make as it is delicious to eat! Happy baking!
Now, your dessert table will never look the same again! Enjoy the delightful world of Pineapple Bliss Bars and share your creations with friends and family—they are bound to love them!
Pineapple Bliss Bars
Ingredients
Method
- Preheat your oven to 350°F (175°C) and grease an 8×8-inch baking pan.
- In a medium bowl, blend the melted butter, flour, and 1/4 cup of sugar until it forms a crumbly mixture. Press this evenly into the bottom of your prepared baking pan.
- Bake for 10–12 minutes or until lightly golden.
- In another bowl, whisk together the eggs, 1/2 cup of sugar, crushed pineapple, and vanilla extract until smooth.
- If desired, fold in shredded coconut for extra texture and flavor.
- Pour the pineapple mixture over the baked crust.
- Return to the oven and bake for an additional 20–25 minutes, until the filling is set and the edges are lightly browned.
- Allow the bars to cool completely in the pan before cutting them into squares.
- Dust with powdered sugar before serving.
Leave a Reply