
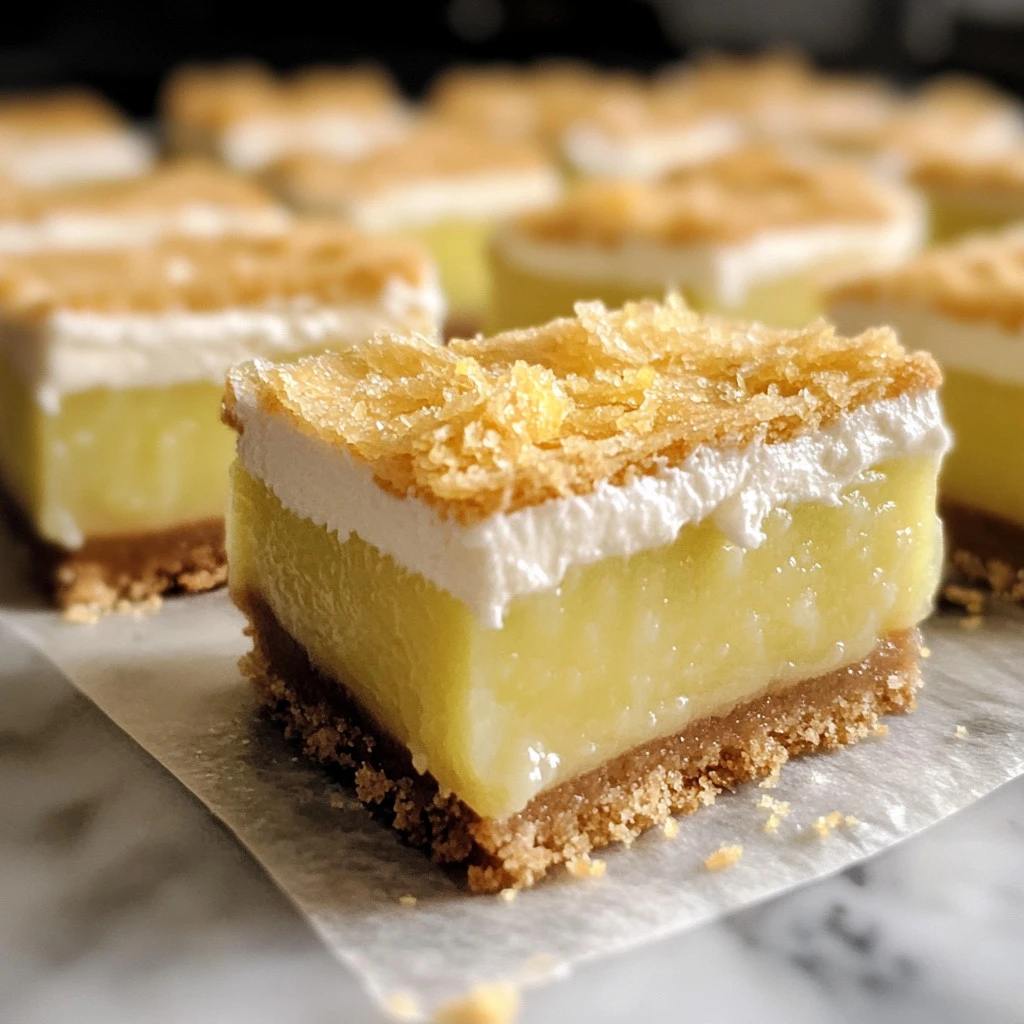
Key Lime Pie Bars: A Delicious Citrus Delight
If you’re searching for a zesty dessert that packs a punch, look no further than Key Lime Pie Bars! These sweet and tangy bars promise a burst of flavor in every bite, making them the perfect treat for any occasion. Imagine the smooth, creamy texture combined with that unmistakable tartness of fresh key lime juice, all nestled within a crumbly graham cracker crust. They’re a crowd-pleaser at potlucks, a refreshing dessert for summer barbecues, or simply a delightful indulgence after dinner.
The rich and tangy flavor of Key Lime Pie Bars will instantly transport you to a sunny beach in Florida, where this dessert originates. Fun fact: Key limes are smaller and more aromatic than regular limes, giving these bars their unique and irresistible flavor! Plus, the recipe is super simple and quick to prepare, making it a family-friendly favorite that even the kids can help whip up. If you love desserts that are easy to make yet impressively delicious, you might also want to check out my refreshing Lemon Bar recipe. Get ready for a kitchen adventure that leaves you with a sweet smile!

What is Key Lime Pie Bars?
So, what exactly are Key Lime Pie Bars? Picture this: the vibrant taste of key limes met with a creamy filling, all elegantly perched atop a buttery graham cracker crust. But where does this quirky name come from? Legend has it that these lovelies were first crafted in the Florida Keys, using the small, tart key limes that grow abundantly there. Is it any wonder they’re such a hit? After all, ‘the way to a man’s heart is through his stomach,’ and these bars are sure to win hearts everywhere! So, why not give them a try? You might just find yourself making them over and over again!
Why You’ll Love These Key Lime Pie Bars
There are countless reasons to adore Key Lime Pie Bars. First and foremost, they’re incredibly delicious! The combination of rich, creamy filling with the tartness of the key lime juice is sheer perfection. Plus, making them at home is a surefire way to save some bucks compared to buying ready-made desserts—think of the savings! And let’s not forget about the topping possibilities! Whether you prefer a dollop of whipped cream, a sprinkle of lime zest, or even a handful of fresh berries, the sky’s the limit when it comes to how you elevate these bars. If you enjoy the refreshing taste of mixed berry desserts, you’ll definitely want to whip up these bars and keep the sweet treat rotation going strong!
How to Make Key Lime Pie Bars
Quick Overview
Ready for a sweet and simple treat? Key Lime Pie Bars are just that! With their creamy texture, tangy flavor, and buttery crust, they’re both satisfying and delightful to indulge in. Best of all, they only take about 30 minutes to prepare (not including chilling time), so you’ll have a fantastic dessert ready in no time!
Key Ingredients for Key Lime Pie Bars
Before diving into the kitchen, here’s what you’ll need to make these bars:
- Graham cracker crumbs – 1 ½ cups (for the crust)
- Granulated sugar – ⅓ cup (to sweeten the crust)
- Unsalted butter – 6 tablespoons, melted (for richness)
- Key lime juice – ½ cup (fresh or bottled)
- Sweetened condensed milk – 1 can (14 ounces, to create that creamy filling)
- Eggs – 2 large (to bind everything together)
- Lime zest – 1 tablespoon (for extra zing)
Step-by-Step Instructions:
- Prepare the Crust: In a mixing bowl, combine the graham cracker crumbs, granulated sugar, and melted butter until evenly mixed. Press this mixture into the bottom of a greased baking pan (preferably 9×9 inches) to form the crust. Bake at 350°F (175°C) for about 10 minutes or until lightly golden.
- Make the Filling: In another bowl, whisk together the key lime juice, sweetened condensed milk, and eggs until well combined. If you want an extra flavor kick, mix in lime zest.
- Combine and Bake: Pour the filling over the baked crust and return the pan to the oven. Bake for an additional 15-20 minutes, or until the filling is set but slightly jiggly.
- Cool and Chill: Once baked, allow the bars to cool at room temperature for a bit before transferring them to the refrigerator. Chill for at least 2 hours, or until fully set.
- Slice and Serve: Cut into bars and serve with your favorite toppings!
What to Serve Key Lime Pie Bars With
These Key Lime Pie Bars are delicious enough on their own, but like any star dessert, they shine even brighter when paired with the right companions! Consider serving them alongside fresh berries for a pop of color and sweetness or topping them with a dollop of whipped cream for a light, fluffy contrast. A scoop of vanilla ice cream would also be a delightful addition, offering a cool counterbalance to the tangy filling. For drinks, how about pairing them with iced tea, lemonade, or even a crisp white wine? The possibilities are endless!
Top Tips for Perfecting Key Lime Pie Bars
To make your Key Lime Pie Bars even more scrumptious, here are some top tips:
- Fresh Juice vs. Bottled: If you can, use fresh key lime juice for the best flavor. The bottled version works in a pinch, but fresh juice is unbeatable.
- Chill Well: Patience is key! Allowing the bars to chill thoroughly will ensure their texture is creamy and set properly.
- Experiment with Toppings: You can get fancy with toppings! Try adding shredded coconut, a mint sprig, or an extra sprinkle of lime zest for an elevated presentation.
Storing and Reheating Tips
Got leftovers? No problem! Store your Key Lime Pie Bars in an airtight container in the refrigerator for up to a week. They can also be frozen for longer storage. Just cut into individual bars, wrap them tightly in plastic wrap, then place them in a freezer-safe container. You can keep them frozen for up to three months. When you’re ready to indulge again, simply thaw in the refrigerator overnight—no need to reheat!
Now, are you ready to whip up these delicious Key Lime Pie Bars? Grab your ingredients, rally your family together, and dive into this zesty dessert adventure that’s sure to impress everyone at the table!
Key Lime Pie Bars: A Delicious Citrus Delight
Ingredients
Method
- Prepare the Crust: In a mixing bowl, combine the graham cracker crumbs, granulated sugar, and melted butter until evenly mixed. Press this mixture into the bottom of a greased baking pan (preferably 9x9 inches) to form the crust. Bake at 350°F (175°C) for about 10 minutes or until lightly golden.
- Make the Filling: In another bowl, whisk together the key lime juice, sweetened condensed milk, and eggs until well combined. If you want an extra flavor kick, mix in lime zest.
- Combine and Bake: Pour the filling over the baked crust and return the pan to the oven. Bake for an additional 15-20 minutes, or until the filling is set but slightly jiggly.
- Cool and Chill: Once baked, allow the bars to cool at room temperature for a bit before transferring them to the refrigerator. Chill for at least 2 hours, or until fully set.
- Slice and Serve: Cut into bars and serve with your favorite toppings!
Leave a Reply