
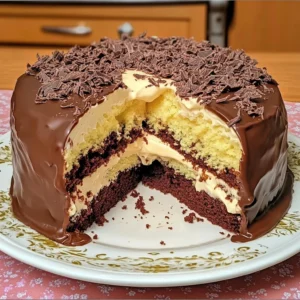
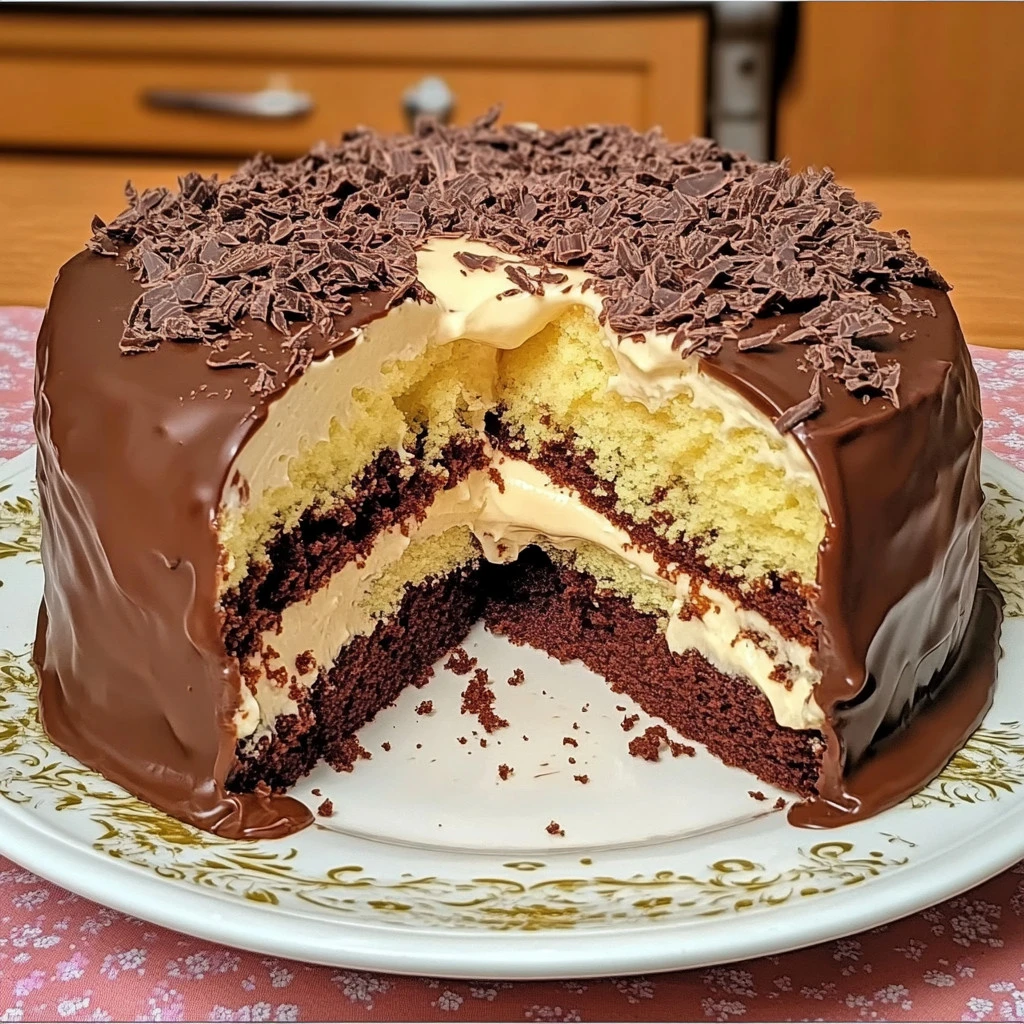
Volcano Cake with Milk Chocolate Filling and White Chocolate Covering
Welcome to the wonderfully delicious world of Volcano Cake with Milk Chocolate Filling and White Chocolate Covering! This irresistible dessert is a treat for the senses, bringing together rich chocolate flavors and a creamy filling that will make your heart swoon. Picture this: a moist cake with a decadent chocolate base, a molten milk chocolate filling, and a smooth white chocolate covering that glistens like a treasure. If you have a sweet tooth, this cake is absolutely meant for you!
Did you know that this cake gets its name from the ooey-gooey chocolate center that erupts with flavor as you cut into it? That’s right! This delightful dessert not only looks stunning, but it also has a fun and interactive element that makes it perfect for gatherings and parties. In just a little over an hour, you’ll be able to whip up this crowd-pleaser, making it an exciting dessert even for those last-minute occasions.
So, if you enjoyed our classic Chocolate Lava Cake, you will absolutely love this Volcano Cake! It’s time to get your apron on and embark on a chocolatey journey that your family and friends will rave about. Let’s dive into this sweet adventure together!
What is Volcano Cake with Milk Chocolate Filling and White Chocolate Covering?
Now, let’s talk about this cake’s rather dramatic name! A volcano naturally conjures images of eruptions, and who wouldn’t want a cake that offers a similar thrill? Can you imagine cutting into a dessert and having a fabulous chocolate explosion splatter onto your plate? Sounds messy, but in the sweetest way possible, right? This cake is affectionately referred to as a “volcano” due to its rich filling that flows out like molten lava when you slice it open. It’s only fitting that a dessert with a personality this bold carries such a catchy title!
As the classic saying goes, “The way to a man’s heart is through his stomach.” This cake is a delightful reminder of that sentiment! Once you serve it warm, everyone will be begging you for the recipe—just don’t be surprised if you find them hovering around the dessert table for seconds. So, are you ready to unleash the volcano in your kitchen? Let’s get to it!
Why You’ll Love This Volcano Cake with Milk Chocolate Filling and White Chocolate Covering:
This Volcano Cake has three main highlights that will make it a star at your next gathering. First, the cake itself is incredibly moist, with the perfect balance of chocolate flavor and sweetness. It’s a true chocolate lover’s dream! Second, instead of spending a fortune at a fancy bakery, you can bring this delectable cake to life right in your very own kitchen, saving you both time and money. Lastly, the flavorful toppings—creamy white chocolate and decorated with black beads—add an extra layer of elegance and taste that will impress anyone who takes a bite.
If you’ve tried our popular Chocolate Mousse Cake, you’ll notice the same luscious chocolate flavor here, just with a fun twist! So, gather your ingredients and prepare for a baking experience that is as rewarding as it is delicious. Trust us; this cake is sure to become a family favorite!
How to Make Volcano Cake with Milk Chocolate Filling and White Chocolate Covering:
Quick Overview
Making this Volcano Cake is easier than you might think! With a preparation time of just around 20 minutes and a baking time of about 35 minutes, you’ll be able to impress your guests without spending too much time in the kitchen. The standout elements that make this cake exceptional are the luscious milk chocolate filling and the creamy white chocolate covering, offering an indulgent dessert experience that is simply unforgettable.
Key Ingredients for Volcano Cake with Milk Chocolate Filling and White Chocolate Covering:
To create this show-stopping dessert, gather the following ingredients:
- 1 cup of milk
- 1 cup of oil
- 3 eggs
- 1/2 cup of sugar
- 1/2 cup of chocolate powder
- 2 cups of wheat flour
- 1 tablespoon of baking powder
- Margarine and wheat flour for greasing
- Black beads for decoration
- 1 can of condensed milk (for filling)
- 1 tablespoon of butter (for filling)
- 1 tablespoon of chocolate powder (for filling)
- 100g chopped milk chocolate (for filling)
- 1/2 cup of cream (for filling)
- 150g chopped white chocolate (for topping)
- 1 tablespoon of butter (for topping)
- 1/2 cup of cream (for topping)
Step-by-Step Instructions:
- Prepare the Batter: In a blender, beat together the milk, oil, eggs, sugar, and chocolate powder until the mixture is smooth and well combined.
- Combine Dry Ingredients: Transfer the blended mixture to a bowl. Mix in the flour and baking powder using a hand mixer until fully incorporated.
- Prepare the Pan: Grease a 22cm diameter loaf pan with margarine and coat it with wheat flour to prevent sticking.
- Bake the Cake: Pour the batter into the prepared loaf pan. Bake in a preheated oven at 180°C (350°F) for about 35 minutes or until the cake is baked through and has a golden color.
- Cool and Unmold: Once baked, allow the cake to cool in the pan for a few minutes before transferring it onto a wire rack to cool completely.
- Make the Filling: In a saucepan over medium heat, combine the condensed milk, butter, chocolate powder, and chopped milk chocolate. Stir continuously until smooth and let it cool slightly, then mix in the cream.
- Prepare the Topping: Melt the white chocolate along with the butter in a separate pan. Add cream and gently mix until well combined.
- Assemble the Cake: After the cake has cooled, use a knife to cut a hole in the center, filling it generously with the chocolate filling. Cover the entire cake with the melted white chocolate mixture and decorate with black beads.
- Serve: Slice the cake to reveal the molten center and enjoy this delightful eruption of flavors!
What to Serve Volcano Cake with:
This Volcano Cake is a glorious dessert on its own, but it can be enhanced with a few complimentary dishes! Serve it alongside freshly whipped cream or a scoop of vanilla ice cream to balance the rich chocolate flavors. Alternatively, you can also pair it with a light fruit salad or a refreshing minty beverage to cleanse the palate. A hot cup of coffee or a rich chocolate drink would also harmonize beautifully with this dessert. The combination of flavors will create a well-rounded meal that your guests will remember!
Top Tips for Perfecting Volcano Cake with Milk Chocolate Filling and White Chocolate Covering:
- Ingredient Substitutions: If you’re out of wheat flour, you can use all-purpose flour instead. For a gluten-free option, try almond flour or a gluten-free flour blend suitable for baking.
- Baking Time: Keep an eye on the cake while it bakes, as ovens can vary. Check for doneness by inserting a toothpick in the center; it should come out clean or with just a few moist crumbs.
- Decorating Tips: Feel free to get creative with your decoration! Instead of black beads, you can use crushed nuts, colorful sprinkles, or edible gold dust for an extra touch of glamour.
Storing and Reheating Tips:
Once you’ve made this Volcano Cake, it’s best to enjoy it fresh! However, if you have leftovers, store them in an airtight container in the refrigerator. The cake will stay fresh for about 3-4 days. If you need to freeze it, ensure it’s well wrapped to prevent freezer burn; it can last for up to two months in the freezer. When you’re ready to indulge again, simply let it thaw in the refrigerator and reheat briefly in the microwave to bring back its delightful gooey filling!
Now that you have all the tips and tricks, it’s time to grab those ingredients and bake your very own Volcano Cake with Milk Chocolate Filling and White Chocolate Covering! Enjoy the journey—and the delicious results!
Volcano Cake with Milk Chocolate Filling and White Chocolate Covering
Ingredients
Method
- Prepare the Batter: In a blender, beat together the milk, oil, eggs, sugar, and chocolate powder until the mixture is smooth and well combined.
- Combine Dry Ingredients: Transfer the blended mixture to a bowl. Mix in the flour and baking powder using a hand mixer until fully incorporated.
- Prepare the Pan: Grease a 22cm diameter loaf pan with margarine and coat it with wheat flour to prevent sticking.
- Bake the Cake: Pour the batter into the prepared loaf pan. Bake in a preheated oven at 180°C (350°F) for about 35 minutes or until the cake is baked through and has a golden color.
- Cool and Unmold: Once baked, allow the cake to cool in the pan for a few minutes before transferring it onto a wire rack to cool completely.
- Make the Filling: In a saucepan over medium heat, combine the condensed milk, butter, chocolate powder, and chopped milk chocolate. Stir continuously until smooth and let it cool slightly, then mix in the cream.
- Prepare the Topping: Melt the white chocolate along with the butter in a separate pan. Add cream and gently mix until well combined.
- Assemble the Cake: After the cake has cooled, use a knife to cut a hole in the center, filling it generously with the chocolate filling. Cover the entire cake with the melted white chocolate mixture and decorate with black beads.
- Serve: Slice the cake to reveal the molten center and enjoy this delightful eruption of flavors!
Leave a Reply