
No-Knead Dutch Oven Bread
Welcome to the amazing world of No-Knead Dutch Oven Bread! If you’re on the hunt for a simple, no-fuss recipe that results in an irresistibly crusty loaf with a soft, chewy interior, then you’ve come to the right place. Imagine waking up to the delicious aroma of freshly baked bread wafting through your home; it’s pure bliss! The beauty of this bread lies in its simplicity and the minimal time investment required, making it perfect for both seasoned bakers and kitchen novices. Did you know that this recipe originated from artisan bakers who wanted to create that quintessential crusty bread without all the hard kneading? The results are nothing short of magical!
If you’ve enjoyed other bread recipes on our blog, like the classic Homemade Focaccia, you know just how satisfying it is to bake your own bread. This No-Knead Dutch Oven Bread takes the cake, or should I say, the loaf! So, let’s roll up our sleeves and get baking!
What is No-Knead Dutch Oven Bread?
Let’s talk about this phenomenal creation known as No-Knead Dutch Oven Bread. You might be wondering, “What does that even mean?” Well, let me break it down for you! This bread is a game-changer, made with just a handful of ingredients that practically do the work for you. No fancy mixers or extensive kneading—just a simple mix, an overnight rise, and a little bit of patience. It’s so easy that even cats might give it a try! The saying goes, “the way to a man’s heart is through his stomach,” and this bread, made with love, will certainly win over everyone. So, why not give this tasty recipe a whirl and impress your family and friends?
Why You’ll Love This No-Knead Dutch Oven Bread:
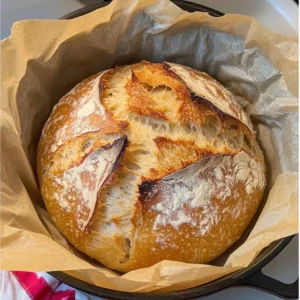
This No-Knead Dutch Oven Bread has so much to offer. First off, the main highlight is its beautifully rustic crust that crackles when you slice into it, revealing a soft and airy crumb inside. Who wouldn’t want that? Secondly, making this bread at home saves you a trip to the store and your hard-earned money; store-bought bread can’t compete with the freshness and unique flavor of your creation. Finally, let’s not forget the endless possibilities for toppings! Spread it with butter, some homemade jam, or even use it for sandwiches. If you loved our Easy Homemade Sourdough, you’ll adore this recipe as well. Get ready to bake a loaf that everyone will be raving about!
How to Make No-Knead Dutch Oven Bread:
Quick Overview
Baking No-Knead Dutch Oven Bread is an incredibly rewarding experience, and you’ll be surprised at how simple it is! With just four main ingredients and a little time for the magic to happen, you’ll produce a delicious bread that’s perfect alongside any meal. The best part? It takes only about 3 hours, including the rising time, and the dough practically does all the work for you!
Key Ingredients for No-Knead Dutch Oven Bread:
- 3 cups all-purpose flour
- 1 1⁄2 teaspoons salt
- 1⁄2 teaspoon instant yeast
- 1 1⁄2 cups warm water
Step-by-Step Instructions:
- Combine Dry Ingredients: In a large mixing bowl, whisk together the flour, salt, and instant yeast until well combined.
- Add Warm Water: Pour in the warm water and stir until a shaggy dough forms. There’s no need for perfection here; just make sure everything is incorporated.
- Cover and Let Rise: Cover the bowl with plastic wrap or a clean kitchen towel and let the dough rise at room temperature for 12 to 18 hours. This long rise is what helps develop those amazing flavors.
- Preheat Oven: About 30 minutes before you’re ready to bake, preheat your oven to 450°F (232°C) and place your Dutch oven (with the lid) inside to heat up.
- Shape the Dough: Once the dough has risen and bubbles are visible, turn it out onto a floured surface. With floured hands, fold the dough a few times to shape it into a ball.
- Let It Rest: Place the shaped dough on a piece of parchment paper and let it rest while the Dutch oven preheats, about 30 minutes.
- Transfer and Bake: Carefully remove the heated Dutch oven, lift the dough with the parchment paper, and place it into the pot. Cover with the lid and bake for 30 minutes.
- Remove Lid and Finish Baking: After 30 minutes, remove the lid and bake for an additional 15 to 20 minutes, until the bread is golden brown and crusty.
- Cool and Serve: Let the bread cool on a wire rack for at least 30 minutes before slicing. Enjoy the warm, homemade goodness!
What to Serve No-Knead Dutch Oven Bread With:
This fantastic bread pairs well with just about anything! Serve it alongside a hearty bowl of soup—think classic Tomato Basil or a cozy Chicken Noodle. For a more elegant touch, enjoy slices alongside a gourmet cheese platter featuring a variety of cheeses and cured meats. It also shines as the base for sandwiches; try it with fresh veggies, deli meats, and flavorful spreads. The options are endless—let your creativity lead the way!
Top Tips for Perfecting No-Knead Dutch Oven Bread:
- Flour Quality Matters: Use high-quality all-purpose flour for the best results. If you want a slightly denser bread, consider using bread flour.
- Temperature Check: Make sure your warm water isn’t too hot; it should be around 110°F (43°C). Too hot can kill the yeast, and too cold can slow down the rising process.
- Don’t Rush the Rise: The longer the dough rises, the better the flavor and texture will be. If you have time, let it sit for the full 18 hours!
- Use a Hot Dutch Oven: A preheated Dutch oven is key to achieving that perfect crust. It creates steam that helps with the bread’s rise and texture.
Storing and Reheating Tips:
If you have leftovers (which is rare, but it happens!), store the bread in a bread box or wrapped in a kitchen towel at room temperature for up to 3 days. To keep it fresher for longer, you can freeze the bread as well. Wrap it tightly in plastic wrap and then in aluminum foil; it can be stored in the freezer for up to 3 months. When you’re ready to enjoy it again, simply thaw and reheat in the oven at 350°F (175°C) for about 10-15 minutes to restore its crusty exterior.
Now that you’re armed with this delicious No-Knead Dutch Oven Bread recipe, it’s time to put on your apron and start baking! Your family and friends won’t believe how easy it was to make, and the warm, crusty aroma will have them flocking to the kitchen. Happy baking!

No-Knead Dutch Oven Bread
Ingredients
Method
- In a large mixing bowl, whisk together the flour, salt, and instant yeast until well combined.
- Pour in the warm water and stir until a shaggy dough forms.
- Cover the bowl with plastic wrap or a clean kitchen towel and let the dough rise at room temperature for 12 to 18 hours.
- About 30 minutes before you’re ready to bake, preheat your oven to 450°F (232°C) and place your Dutch oven (with the lid) inside to heat up.
- Once the dough has risen and bubbles are visible, turn it out onto a floured surface. With floured hands, fold the dough a few times to shape it into a ball.
- Place the shaped dough on a piece of parchment paper and let it rest while the Dutch oven preheats, about 30 minutes.
- Carefully remove the heated Dutch oven, lift the dough with the parchment paper, and place it into the pot. Cover with the lid and bake for 30 minutes.
- After 30 minutes, remove the lid and bake for an additional 15 to 20 minutes, until the bread is golden brown and crusty.
- Let the bread cool on a wire rack for at least 30 minutes before slicing.
Leave a Reply