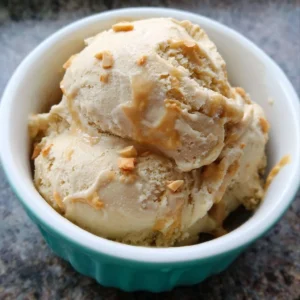
No Churn Dairy Free Peanut Butter Ice Cream: A Creamy Delight for Everyone!
Calling all ice cream lovers! Are you ready to scoop into something incredibly creamy, nutty, and utterly delightful? Say goodbye to store-bought ice creams packed with preservatives and hello to homemade bliss! This No Churn Dairy Free Peanut Butter Ice Cream is the ultimate treat for hot summer days or any time you’re craving a sweet fix. Not only is it unbelievably easy to make with just a few simple ingredients, but it also caters to those who are dairy-free, ensuring everyone can indulge.
Fun fact: Did you know that peanut butter wasn’t popularized until the early 20th century? It has since become a beloved staple around the world. Just like our beloved Peanut Butter Banana Smoothie, which has graced our blog, this ice cream packs a flavor punch that will transport you back to childhood summer afternoons. So grab your spoons and get ready for some fun, because once you try making this scrumptious treat, you’ll be hooked!

What is No Churn Dairy Free Peanut Butter Ice Cream?
Now, you might be wondering, why on earth is it called No Churn Dairy Free Peanut Butter Ice Cream? Well, let’s unpack that! First off, “No Churn” simply means you won’t need any fancy ice cream maker or special gadgets. We’re going old-school here with a simple method that’s all about convenience. And “Dairy Free”? That’s right! We’re ditching the dairy without sacrificing creaminess, so it’s perfect for all sorts of dietary preferences.
And peanut butter? Oh, the joys of this versatile spread! It’s been said that ‘the way to a man’s heart is through his stomach,’ and nothing proves that better than a bowl of this luscious ice cream! Trust me, you’ll want to savor every spoonful. So let’s get ready to whip up this delightful dessert!
Why You’ll Love This No Churn Dairy Free Peanut Butter Ice Cream
Get ready for a flavor explosion in every scoop! The creamy texture and rich peanut butter flavor make No Churn Dairy Free Peanut Butter Ice Cream an absolute winner. Imagine velvety goodness mixed with the nutty essence of peanut butter dancing on your taste buds! Not only does it deliver that tempting taste, but it also offers a delightful way to save money. Homemade treats can be much more budget-friendly than store-bought options, especially when you’re craving ice cream regularly.
Add a sprinkle of vegan chocolate chips or a drizzle of rich dark chocolate to elevate your masterpiece. Just as our Chocolate Chip Cookie Recipe does, this ice cream will offer the perfect balance of flavors and textures. Don’t wait! Grab your ingredients and let’s dive into making this mouthwatering treat!
How to Make No Churn Dairy Free Peanut Butter Ice Cream
Quick Overview
Making No Churn Dairy Free Peanut Butter Ice Cream is as simple as mixing, freezing, and enjoying! In just 10 minutes of active preparation, you will have a decadent dessert waiting for you in the freezer. No fancy skills or equipment are required, making it super accessible for everyone, from beginners to seasoned pros. Now let’s get started!
Key Ingredients for No Churn Dairy Free Peanut Butter Ice Cream:
- 1 cup dairy-free creamy peanut butter
- 1 cup coconut cream (chilled)
- 1/2 cup maple syrup (or agave syrup)
- 1 tablespoon vanilla extract
- A pinch of salt
Step-by-Step Instructions:
- Prepare the Coconut Cream: Start by chilling a can of coconut cream in the refrigerator overnight. This will help to separate the cream from the water, giving you the thick, creamy consistency needed for our ice cream.
- Mix Ingredients: In a mixing bowl, combine 1 cup of dairy-free creamy peanut butter, 1/2 cup of maple syrup, 1 tablespoon of vanilla extract, and a pinch of salt. Stir until everything is smoothly blended.
- Add the Coconut Cream: Remove your chilled coconut cream from the fridge and scoop only the thick cream into your peanut butter mixture. Gently fold the coconut cream into the peanut butter mixture using a spatula. Be careful not to deflate the cream too much to maintain that creamy texture!
- Transfer to a Container: Once combined, transfer the mixture into an airtight container and smooth the top.
- Freeze: Place the container in the freezer for at least 4-6 hours or overnight until solid.
- Scoop and Enjoy: When you’re ready to indulge, remove from the freezer and let it sit at room temperature for a few minutes for easier scooping. Serve into bowls, top with your favorite toppings, and enjoy!
What to Serve No Churn Dairy Free Peanut Butter Ice Cream With
No one likes to eat ice cream alone! Pair this delightful creation with freshly sliced bananas, a sprinkle of crushed nuts, or a side of homemade dairy-free brownies. For a refreshing twist, a splash of cold almond milk on the side would enhance the experience perfectly. Each of these pairings offers a unique flavor combination that takes your dessert game to the next level!
Top Tips for Perfecting No Churn Dairy Free Peanut Butter Ice Cream
- Quality Matters: Use high-quality peanut butter with no added sugar or hydrogenated oils for the best flavor.
- Coconut Cream Substitutes: If you’re not keen on coconut, you can try using cashew cream or even ripe avocados for a creamy base, though it will alter the flavor slightly.
- Sweetness Balance: Adjust the amount of maple syrup based on your sweetness preference. Taste and add more if needed!
- Freezing Time: Be patient with freezing; letting it sit overnight gives the best texture. And remember, if it freezes too hard, let it soften for a few minutes before scooping!
Storing and Reheating Tips
Store your No Churn Dairy Free Peanut Butter Ice Cream in an airtight container in the freezer to keep it fresh. This delicious dessert can last up to 1 month in the freezer without losing quality. When you want to enjoy a scoop again, let it sit at room temperature for about 5-10 minutes to allow for easy scooping. If you notice any extra hard bits, simply mash them up with a fork and mix for a fresh consistency.
With these tips, you’ll always have this delectable treat ready for any occasion. Now it’s time to gather your ingredients and make your own batch today! Enjoy the creamy goodness of No Churn Dairy Free Peanut Butter Ice Cream, and don’t forget to share your experience in the comments below!

No Churn Dairy Free Peanut Butter Ice Cream
Ingredients
Method
- Start by chilling a can of coconut cream in the refrigerator overnight to separate the cream from the water.
- In a mixing bowl, combine dairy-free creamy peanut butter, maple syrup, vanilla extract, and a pinch of salt. Stir until smoothly blended.
- Remove the chilled coconut cream from the fridge and scoop only the thick cream into the peanut butter mixture. Gently fold it using a spatula.
- Transfer the mixture to an airtight container and smooth the top.
- Place the container in the freezer for at least 4-6 hours or overnight until solid.
- To serve, remove from the freezer and let sit at room temperature for a few minutes for easier scooping.

Leave a Reply