
A Creamy Indulgence Awaits!
Who doesn’t love a classic dessert that combines rich flavors with a light, fluffy texture? Enter the Gluten-Free Vegan Boston Cream Pie! This guilt-free twist on the traditional favorite offers all the luscious cream and chocolate you crave, without any of the animal products or gluten that often accompany such treats.
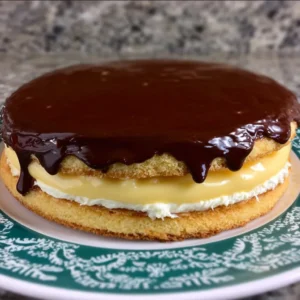
Did you know Boston Cream Pie is actually a cake? This delightful dish brings together layers of spongy cake, velvety vanilla cream, and a decadent chocolate glaze for a truly delightful experience. The best part? It’s surprisingly simple to whip up and perfect for gatherings, family dinners, or just treating yourself after a long day!
If you’ve ever enjoyed classic cakes like our Vegan Chocolate Cake, you’ll adore this variation. The fresh flavors and the satisfying texture make this dessert a standout choice. So, whether you’re gluten-free, vegan, or just looking to satisfy your sweet tooth, get ready to dive into making this show-stopping Boston Cream Pie!
What is Gluten-Free Vegan Boston Cream Pie?
Have you ever wondered why Boston Cream Pie carries such a fancy name? It’s a delightful misnomer that makes you picture a traditional pie when it’s really a cake! Born in the 19th century, this sweet treat includes layers of fluffy vanilla cream and smooth chocolate ganache, making it a crowd-pleaser for sure! Legend has it that the creation of Boston Cream Pie was inspired by the passion to impress guests—really, “the way to a man’s heart is through his stomach!”
So why not indulge in a slice of this creamy confection? Whether you’re aiming to wow friends at a dinner party or just craving something sweet on a Tuesday night, this Gluten-Free Vegan Boston Cream Pie will surely satisfy your dessert desires!
Why You’ll Love This Gluten-Free Vegan Boston Cream Pie
This pie is not just a pretty face—it delivers on flavor and quality like no other! Here are three reasons you’ll want to make this recipe a staple in your dessert repertoire:
- A Comforting Classic: Our Gluten-Free Vegan Boston Cream Pie strikes the perfect balance between a pillowy cake and rich filling, giving you a dose of nostalgia with every bite. Imagine a light sponge cake layered with creamy vanilla custard, topped off with decadent chocolate ganache—doesn’t that sound heavenly?
- Budget-Friendly Delight: Who says gourmet desserts have to break the bank? Making this pie at home can save you money while still impressing your taste buds. With minimal ingredients and low prep costs, you won’t have to budget carefully! This way, you can whip up a delicious dessert without worrying about the expensive price tag that comes with buying it from a bakery.
- Limitless Toppings: Get creative! This pie is incredibly versatile and you can personalize it with various toppings. From fresh fruit like strawberries or raspberries to crunchy nuts, the options are endless. You can even serve it with a scoop of refreshing dairy-free ice cream for an extra delectable treat.
Ready to make your very own Gluten-Free Vegan Boston Cream Pie at home? Let’s dive into the simple steps!
How to Make Gluten-Free Vegan Boston Cream Pie
Quick Overview
Making a Gluten-Free Vegan Boston Cream Pie is easier than you might think. With a preparation time of just 30 minutes, it’s quick, and the resulting layers of flavor are nothing short of divine! This pie combines simple ingredients with minimal fuss; it’s perfect for both novice bakers and seasoned pros.
Key Ingredients for Gluten-Free Vegan Boston Cream Pie
- For the Cake:
- 1.5 cups gluten-free flour blend
- 1 cup coconut sugar (or cane sugar)
- 1/2 teaspoon baking soda
- 1/2 teaspoon baking powder
- 1/4 teaspoon sea salt
- 1 cup unsweetened almond milk (or any plant-based milk)
- 1/3 cup coconut oil, melted
- 1 teaspoon vanilla extract
- For the Vanilla Cream Filling:
- 1 can (13.5 oz) full-fat coconut milk (chilled, cream only)
- 1/4 cup maple syrup
- 1 teaspoon vanilla extract
- 1 tablespoon cornstarch (or arrowroot powder)
- For the Chocolate Ganache:
- 1 cup dairy-free chocolate chips
- 1/2 cup coconut milk
Step-by-Step Instructions:
- Make the Cake Layers: Preheat your oven to 350°F (175°C). In a large bowl, combine the gluten-free flour, coconut sugar, baking powder, baking soda, and salt. In a separate bowl, whisk together the almond milk, melted coconut oil, and vanilla extract. Pour the wet ingredients into the dry ingredients and mix until combined. Divide the batter evenly between two greased 9-inch round cake pans, and bake for 20-25 minutes until a toothpick inserted in the center comes out clean.
- Prepare the Vanilla Cream: In a medium bowl, scoop out the chilled coconut cream and whisk until smooth. Gradually add in the maple syrup, vanilla extract, and cornstarch, mixing until creamy and well-combined.
- Make the Chocolate Ganache: In a small saucepan, heat the coconut milk until warm but not boiling. Remove from heat and stir in the dairy-free chocolate chips until melted and smooth.
- Assemble the Pie: Once your cakes have cooled, place one layer on a serving plate. Spread the vanilla cream filling evenly over the top, then place the second cake layer on top. Drizzle the chocolate ganache over the cake, allowing it to drip down the sides for a gorgeous finish.
- Chill and Serve: Refrigerate the assembled pie for at least an hour before slicing. Enjoy!
What to Serve Gluten-Free Vegan Boston Cream Pie With
Pair your Boston Cream Pie with some fabulous complements! Consider serving it with a side of fresh berries for a burst of fruity flavor. A cup of dairy-free coffee or tea can also be a great addition, adding warmth and richness to your dessert experience. For an extra touch of fun, enjoy with a scoop of vegan vanilla ice cream—the creaminess will elevate the whole dessert!
Top Tips for Perfecting Gluten-Free Vegan Boston Cream Pie
- To ensure the best results, use a high-quality gluten-free flour blend for that perfect texture. Some blends behave better than others—look for one specifically meant for baking.
- If you find your coconut cream isn’t firm enough after chilling, you can stabilize it with an extra tablespoon of cornstarch. This ensures your filling holds its shape beautifully.
- Be mindful of baking times. Every oven is different—keep an eye on your cakes while they bake and do the toothpick test to avoid over-baking.
Storing and Reheating Tips
Leftover pie? No problem! Store your Gluten-Free Vegan Boston Cream Pie covered in the refrigerator for up to 4 days. To prevent the chocolate ganache from getting too dry or losing its sheen, keep it well-sealed. If you want to store it longer, you can freeze individual slices wrapped with plastic wrap and placed in an airtight container for up to a month. To enjoy, simply thaw in the refrigerator overnight or at room temperature for a few hours!
With all these delectable features and a few fun twists, the Gluten-Free Vegan Boston Cream Pie is destined to become your new favorite dessert. There’s no reason to hold back on indulgence when it’s this easy and satisfying! Enjoy every slice!

Gluten-Free Vegan Boston Cream Pie
Ingredients
Method
- Preheat your oven to 350°F (175°C). In a large bowl, combine the gluten-free flour, coconut sugar, baking powder, baking soda, and salt.
- In a separate bowl, whisk together the almond milk, melted coconut oil, and vanilla extract.
- Pour the wet ingredients into the dry ingredients and mix until combined.
- Divide the batter evenly between two greased 9-inch round cake pans, and bake for 20-25 minutes until a toothpick inserted in the center comes out clean.
- In a medium bowl, scoop out the chilled coconut cream and whisk until smooth.
- Gradually add in the maple syrup, vanilla extract, and cornstarch, mixing until creamy and well-combined.
- In a small saucepan, heat the coconut milk until warm but not boiling.
- Remove from heat and stir in the dairy-free chocolate chips until melted and smooth.
- Once your cakes have cooled, place one layer on a serving plate.
- Spread the vanilla cream filling evenly over the top, then place the second cake layer on top.
- Drizzle the chocolate ganache over the cake, allowing it to drip down the sides for a gorgeous finish.
- Refrigerate the assembled pie for at least an hour before slicing. Enjoy!
Leave a Reply