
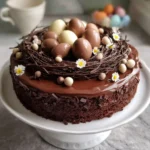
Chocolate Easter Egg Nest Cake: A Sweet Celebration
Easter is a time for family, fun, and of course, delightful sweets that bring everyone together. If you’re looking for a showstopper dessert that is both visually stunning and utterly delicious, then the Chocolate Easter Egg Nest Cake is just what you need. Imagine a rich chocolate cake layered with creamy frosting, topped with a whimsical nest made of chocolate and filled with colorful Easter eggs. It’s every chocolate lover’s dream and a treat kids absolutely adore! Fun fact: this cake not only tastes incredible but also serves as a fun activity for the whole family—assembling the chocolate nest is like crafting edible art! So, gather your loved ones, and let’s dive into a recipe that’s simple enough for beginners but impressive enough to wow guests. If you love crowd-pleasing desserts, be sure to check out our Lemon Cream Layer Cake as well for another joyous flavor experience. Let’s get started on this fabulous Chocolate Easter Egg Nest Cake!

What is the Chocolate Easter Egg Nest Cake?
So, what’s in a name? The Chocolate Easter Egg Nest Cake is as whimsical as it sounds! It’s basically a chocolatey wonderland layered with scrumptious goodness. Have you heard that saying, “the way to a man’s heart is through his stomach”? Well, this cake definitely embodies that sentiment, and who wouldn’t want to steal hearts with such a chocolaty creation? The word “nest” sparks curiosity—is it a bird’s nest? A chocolate nest filled with goodies? Spoiler alert: it’s both! The nest symbolizes springtime and Easter celebrations, making it the ultimate festive dessert. So why not whip up this show-stopping delight and surprise your family? Trust me; they’ll be egg-static about it!
Why You’ll Love This Chocolate Easter Egg Nest Cake
You might be wondering, what makes the Chocolate Easter Egg Nest Cake so special? Well, let’s break it down! First and foremost, the rich, velvety chocolate cake paired with creamy frosting makes this dessert irresistibly delicious. Isn’t it comforting to know that you can create a bakery-quality cake right in your own kitchen? Secondly, this recipe is budget-friendly! Making it at home costs much less than purchasing a custom cake from a bakery. You’ll not only save money, but also create unforgettable memories while baking together. And finally, the creative toppings of the chocolate nest and colorful Easter eggs make this cake both festive and fun, bringing pure joy to the entire table. If you like this creation, you might want to explore our Coconut Cream Cake recipe for another delightful baking adventure. Now that you know why this cake is a must-try, let’s get started on making it!
How to Make Chocolate Easter Egg Nest Cake
Quick Overview
The Chocolate Easter Egg Nest Cake is a simple yet mouthwatering dessert that will satisfy all your chocolate cravings. With a total preparation time of around 1 hour and 30 minutes, you can make this cake with minimal fuss and maximum flavor! And if you’re a fan of textures, get ready for the delightful crunch from the chocolate nest combined with a creamy, decadent frosting.
Key Ingredients for Chocolate Easter Egg Nest Cake
For the rich chocolate cake:
- 1 ¾ cups all-purpose flour
- 1 ¾ cups granulated sugar
- ¾ cup unsweetened cocoa powder
- 1 ½ teaspoons baking powder
- 1 ½ teaspoons baking soda
- 1 teaspoon salt
- 2 large eggs
- 1 cup whole milk
- ½ cup vegetable oil
- 2 teaspoons vanilla extract
- 1 cup boiling water
For the frosting:
- 1 cup unsalted butter, softened
- 3 ½ cups powdered sugar
- ½ cup unsweetened cocoa powder
- 1 teaspoon vanilla extract
- ¼ cup milk (as needed)
For the chocolate nest:
- 2 cups chocolate chips (semi-sweet or milk chocolate)
- 1 ½ cups shredded coconut (optional)
- Edible Easter egg candies or chocolate eggs for decorating
Step-by-Step Instructions
- Prepare the Oven and Pans: Preheat your oven to 350°F (175°C). Grease and flour two 9-inch round cake pans.
- Mix Dry Ingredients: In a large bowl, combine the flour, sugar, cocoa powder, baking powder, baking soda, and salt. Whisk together until thoroughly mixed.
- Add Wet Ingredients: Add the eggs, milk, vegetable oil, and vanilla extract to the dry mixture. Use a mixer to beat the mixture on medium speed for 2 minutes, ensuring everything is well combined.
- Add Boiling Water: Slowly stir in the boiling water (batter will be thin). Pour the batter evenly into the prepared cake pans.
- Bake: Bake in the preheated oven for 30 to 35 minutes, or until a toothpick inserted in the center comes out clean. Allow cakes to cool in the pans for 10 minutes, then turn out onto wire racks to cool completely.
- Make the Frosting: In a large bowl, beat the softened butter with an electric mixer until creamy. Gradually add powdered sugar and cocoa powder, mixing on low speed. Add milk and vanilla, and beat until light and fluffy.
- Frost the Cake: Once the cakes are completely cool, place one layer on a serving plate. Spread a layer of frosting on top, then place the second layer on top and frost the entire cake.
- Make the Nest: Melt chocolate chips in a microwave or double boiler. Stir in shredded coconut if using. Allow to cool slightly, then shape the chocolate mixture into a nest on top of the cake, creating a hollow space in the center.
- Decorate: Fill the nest with Easter egg candies or chocolate eggs and enjoy!
What to Serve Chocolate Easter Egg Nest Cake With
Pair your Chocolate Easter Egg Nest Cake with a light dessert wine or a refreshing scoop of vanilla ice cream for a well-rounded treat. You can also serve it alongside strawberries or mixed seasonal fruit to balance the richness of the chocolate cake. If you’re hosting an Easter brunch, adding a colorful fruit salad would provide a welcomed contrast to the cake’s sweetness.
Top Tips for Perfecting Chocolate Easter Egg Nest Cake
- Use High-Quality Chocolate: For the best flavor, opt for high-quality chocolate chips for both the cake and the nest.
- Let it Cool Completely: Ensure your cakes are entirely cool before frosting to prevent the frosting from melting and sliding off.
- Experiment with Fillings: Consider adding raspberry jam or caramel between the layers for an extra burst of flavor.
- Avoid Overmixing: When combining wet and dry ingredients, mix just until combined to keep the cake light and fluffy.
Storing and Reheating Tips
Store leftover Chocolate Easter Egg Nest Cake in an airtight container in the refrigerator for up to 4 days. If it’s frosted, ensure it’s covered well to maintain freshness. For longer storage, you can freeze individual slices in freezer-safe bags for up to 3 months. When you’re ready to enjoy, let it thaw in the refrigerator overnight and serve cold, or warm it up in the microwave for just a few seconds to get a gooey chocolate experience.
This Chocolate Easter Egg Nest Cake is more than just a dessert; it’s an experience! Get ready to wow your family and friends with this delightful creation. Happy baking!
Chocolate Easter Egg Nest Cake
Ingredients
Method
- Preheat your oven to 350°F (175°C). Grease and flour two 9-inch round cake pans.
- In a large bowl, combine the flour, sugar, cocoa powder, baking powder, baking soda, and salt. Whisk together until thoroughly mixed.
- Add the eggs, milk, vegetable oil, and vanilla extract to the dry mixture. Use a mixer to beat the mixture on medium speed for 2 minutes.
- Slowly stir in the boiling water (batter will be thin). Pour the batter evenly into the prepared cake pans.
- Bake in the preheated oven for 30 to 35 minutes, or until a toothpick inserted in the center comes out clean. Allow cakes to cool in the pans for 10 minutes, then turn out onto wire racks to cool completely.
- In a large bowl, beat the softened butter with an electric mixer until creamy. Gradually add powdered sugar and cocoa powder, mixing on low speed. Add milk and vanilla, and beat until light and fluffy.
- Once the cakes are completely cool, place one layer on a serving plate. Spread a layer of frosting on top, then place the second layer on top and frost the entire cake.
- Melt chocolate chips in a microwave or double boiler. Stir in shredded coconut if using. Allow to cool slightly, then shape the chocolate mixture into a nest on top of the cake, creating a hollow space in the center.
- Fill the nest with Easter egg candies or chocolate eggs and enjoy!
Leave a Reply