
Artisan Bread: A Slice of Heaven
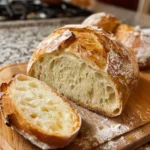
There’s nothing quite like the aroma of freshly baked bread wafting through your kitchen, right? Artisan bread is a warm, crusty delight that can transform any meal into a celebration. Whether served with a pat of butter, enjoyed with a bowl of soup, or used to create the ultimate sandwich, this bread is all about simplicity and comfort. What makes artisan bread special is its rustic crust and chewy interior, achieved through a slow fermentation process that allows the flavors to develop beautifully. Fun fact: artisan bread gained popularity because bakers needed a way to make their loaves stand out in a world dominated by mass-produced varieties. So why not roll up your sleeves and give this recipe a go? Trust me; it’s a rewarding experience that the whole family can join in on. If you love homemade goodies, you might recognize artisan bread for its exquisite texture and flavor, just like our popular no-knead bread recipe. Let’s get excited about baking this delicious bread together!

What is Artisan Bread?
Artisan bread – sounds fancy, doesn’t it? But here’s the kicker: the name actually refers to the craftsmanship that goes into making it. It’s not just your run-of-the-mill loaf; it’s a love letter to the art of breadmaking and the pursuit of flavor! There’s a chance you may have heard the saying, “the way to a man’s heart is through his stomach,” and I dare say, artisan bread is part of that mission! Imagine a chilly evening, and you’ve just pulled a golden-brown loaf from the oven. Your friends and family might just fall a little more in love with you! So grab your apron and let’s create something spectacular together!
Why You’ll Love This Artisan Bread
There are three standout reasons to embrace artisan bread in your baking adventures. First, the main highlight is its incredible crust – it’s beautifully golden and crackly on the outside, with a soft, airy interior that practically melts in your mouth. Secondly, by crafting this at home, you’re saving some bucks while indulging in gourmet goodness. Store-bought artisan bread can be pricey, but your own homemade version is a total game-changer! And let’s not forget those flavor-packed toppings; you can dress it up with olive oil, balsamic vinegar, or even try pairing it with your favorite spreads. If you’ve ever enjoyed a bruschetta or a classic sandwich, you’ll see how artisan bread can elevate even the simplest meals. Ready for an adventure in your kitchen? Let’s get started!
How to Make Artisan Bread
Quick Overview
The beauty of artisan bread is in its simplicity and low effort for a rewarding result. With a short ingredient list and minimal active preparation time, you’ll be amazed at how easy it is to create magic in the oven. You can craft this delicious loaf in about 3 hours, but most of that time is hands-off for letting it rise – perfect for a lazy weekend afternoon when you want to impress your family or guests!
Key Ingredients for Artisan Bread
- 3 cups all-purpose flour
- 1 ½ teaspoons salt
- 1 teaspoon sugar
- 1 packet (2 ¼ teaspoons) active dry yeast
- 1 ¼ cups warm water (about 110°F/43°C)
Step-by-Step Instructions:
- Activate the Yeast: In a bowl, mix the warm water, sugar, and active dry yeast. Allow it to sit for about 5-10 minutes until it’s frothy.
- Mix the Dry Ingredients: In a large mixing bowl, combine 3 cups of flour and salt. Stir to evenly distribute the salt throughout the flour.
- Combine and Form Dough: Once the yeast is activated, pour it into the flour mixture. Stir until the dough comes together; it should be sticky and shaggy.
- First Rise: Cover the bowl with a damp cloth or plastic wrap and let it rise in a warm place for about 1-2 hours, or until it has doubled in size.
- Shape the Dough: Gently flour your work surface and turn the dough out. Fold it a few times to release air, then shape it into a round loaf.
- Second Rise: Place the shaped dough onto a floured piece of parchment paper. Cover it and let it rise for another 30-60 minutes.
- Preheat the Oven: While the dough is rising, preheat your oven to 450°F (230°C). If you have a Dutch oven, place it inside to heat up as well.
- Bake the Bread: Once the dough has risen, carefully remove the hot Dutch oven, and transfer the bread (with parchment) into it. Cover it with the lid and bake for 30 minutes. After that, remove the lid and bake for an additional 15-20 minutes until golden brown.
- Cool It Down: Transfer the bread onto a wire rack to cool before slicing.
What to Serve Artisan Bread With
Artisan bread is incredibly versatile – it pairs beautifully with a variety of dishes! Consider serving it alongside a steaming bowl of homemade tomato soup for a classic comfort meal. If you’re in the mood for a light lunch, make an avocado toast topped with fresh herbs and a drizzle of olive oil. For something heartier, it can be the star in a gourmet sandwich filled with roasted veggies and cheese. Don’t forget to serve it with some dips like hummus or a rich tapenade for a tasty appetizer!
Top Tips for Perfecting Artisan Bread
To truly master this artisan bread recipe, here are a few tips to keep in mind:
- Use Quality Ingredients: The better the flour, the better the bread!
- Time is Key: Allow the dough to rise properly; it’s crucial for flavor.
- Don’t Rush the Bake: A good crust forms by keeping the lid on the Dutch oven initially and allowing it to bake longer to achieve golden-brown perfection.
- Experiment with Flavors: Consider adding herbs, seeds, or even cheeses into the dough for an added flavor punch!
Storing and Reheating Tips
Once you’ve baked a delicious loaf, you’ll want to make sure it stays fresh! Store your artisan bread in a paper bag at room temperature for up to 3 days. For longer storage, wrap it tightly in plastic and freeze it for up to 3 months. When you’re ready to enjoy, simply thaw at room temperature and reheat in a 350°F (175°C) oven for about 10 minutes for that fresh, warm touch.
Now, get ready to share your artisan bread with friends and family – it’s bound to be a crowd-pleaser! Happy baking!
Artisan Bread
Ingredients
Method
- In a bowl, mix the warm water, sugar, and active dry yeast. Allow it to sit for about 5-10 minutes until it’s frothy.
- In a large mixing bowl, combine 3 cups of flour and salt. Stir to evenly distribute the salt throughout the flour.
- Once the yeast is activated, pour it into the flour mixture. Stir until the dough comes together; it should be sticky and shaggy.
- Cover the bowl with a damp cloth or plastic wrap and let it rise in a warm place for about 1-2 hours, or until it has doubled in size.
- Gently flour your work surface and turn the dough out. Fold it a few times to release air, then shape it into a round loaf.
- Place the shaped dough onto a floured piece of parchment paper. Cover it and let it rise for another 30-60 minutes.
- While the dough is rising, preheat your oven to 450°F (230°C). If you have a Dutch oven, place it inside to heat up as well.
- Once the dough has risen, carefully remove the hot Dutch oven, and transfer the bread (with parchment) into it. Cover it with the lid and bake for 30 minutes.
- After that, remove the lid and bake for an additional 15-20 minutes until golden brown.
- Transfer the bread onto a wire rack to cool before slicing.
Leave a Reply