
Mummy Rice Krispie Treats
When it comes to delightful snacks that tickle the taste buds, Mummy Rice Krispie Treats are a winning choice! Their perfect blend of crunchy Rice Krispies, gooey melted marshmallow, and a sweet finish make them irresistibly delicious. Imagine gathering the family for a cozy evening, crafting these delightful treats that evoke creativity and teamwork. A fun little anecdote for you: did you know that Rice Krispie Treats were first invented in the 1930s? That’s right! Just like our classic chocolate chip cookies, these treats have stood the test of time, making their way into family kitchens everywhere.
What makes Mummy Rice Krispie Treats particularly special is their simplicity. Easy enough for young children to help with, they transform an ordinary dessert into a festive, spooky creation for family gatherings. If you enjoy the classic flavor of Rice Krispie Treats, then you’re sure to appreciate the seasonal twist we give these, drawing inspiration from other popular recipes on the blog, like our Halloween-themed pumpkin cookies!
What is Mummy Rice Krispie Treats?
So, have you ever wondered why they’re called “Mummy” Rice Krispie Treats? Seems a bit mysterious, right? Picture this: gooey, soft marshmallow wrapped around crunchy cereal, then adorned with playful icing and candy eyes—no actual mummies involved! It’s the creative spin on a classic treat that will have your loved ones lining up for seconds. After all, isn’t it true that the way to a man’s heart is through his stomach? Whether you’re whipping these treats up for a gathering or just to brighten up your week, you’re guaranteed smiles! Get ready to dive into the delightful world of Mummy Rice Krispie Treats!
Why You’ll Love This Mummy Rice Krispie Treats
Crispy Goodness: The main highlight of these Mummy Rice Krispie Treats is undeniably their texture. Each bite offers a delightful crispiness thanks to the Rice Krispies, perfectly balanced with the creaminess of marshmallows. They’re not only fun to make but also enjoyable to eat—an exciting treat for kids and adults alike!
Cost-Effective: It’s incredible how much you can save by cooking at home. These treats require just a handful of ingredients, making them budget-friendly without compromising on flavor. Think of how expensive pre-packaged snacks can get, especially during special occasions!
Flavorful Toppings: Besides the base, you can personalize these treats with various toppings. From fun Halloween sprinkles to chocolate drizzle, the possibilities are endless. If you love the vibrant taste of caramel popcorn, you’ll surely enjoy the delightful combinations these Mummy Rice Krispie Treats can offer. So, gather your ingredients and join the fun in the kitchen!
How to Make Mummy Rice Krispie Treats
Quick Overview
Mummy Rice Krispie Treats embody everything a snack should be—easy, satisfying, and totally delectable! With a preparation time of just 15 minutes, you can whip up this treat and enjoy the bites’ crisp and gooey texture.
Ingredients
- 3 tablespoons butter
- 1 package (10 oz., about 40) marshmallows
- 6 cups Rice Krispies cereal
- White chocolate or candy melts
- Black candy eyes
- Chocolate or black icing
Preparation Notes
Ensure all ingredients are Halal-friendly. This dish is simple to make, and you should have everything ready before starting!
Step-by-Step Instructions
-
Prepare Your Workspace: Begin by greasing a 9×13 inch baking dish with butter or lining it with parchment paper for easy removal. This ensures that your treats won’t stick!
-
Melt Butter and Marshmallows: In a large saucepan over low heat, melt the butter. Once melted, add the marshmallows and stir until they are completely melted and smooth.
-
Combine with Rice Krispies: Remove the mixture from heat and add the Rice Krispie cereal. Stir until everything is thoroughly coated in the marshmallow mixture.
-
Press Into the Baking Dish: Transfer the Rice Krispie mixture into the prepared baking dish. Using a spatula, press it down firmly into an even layer. Make sure not to compress it too tightly, as you want that lovely crunch!
-
Let It Set: Allow the treats to cool for about 30 minutes. This will help them hold their shape when you cut them.
-
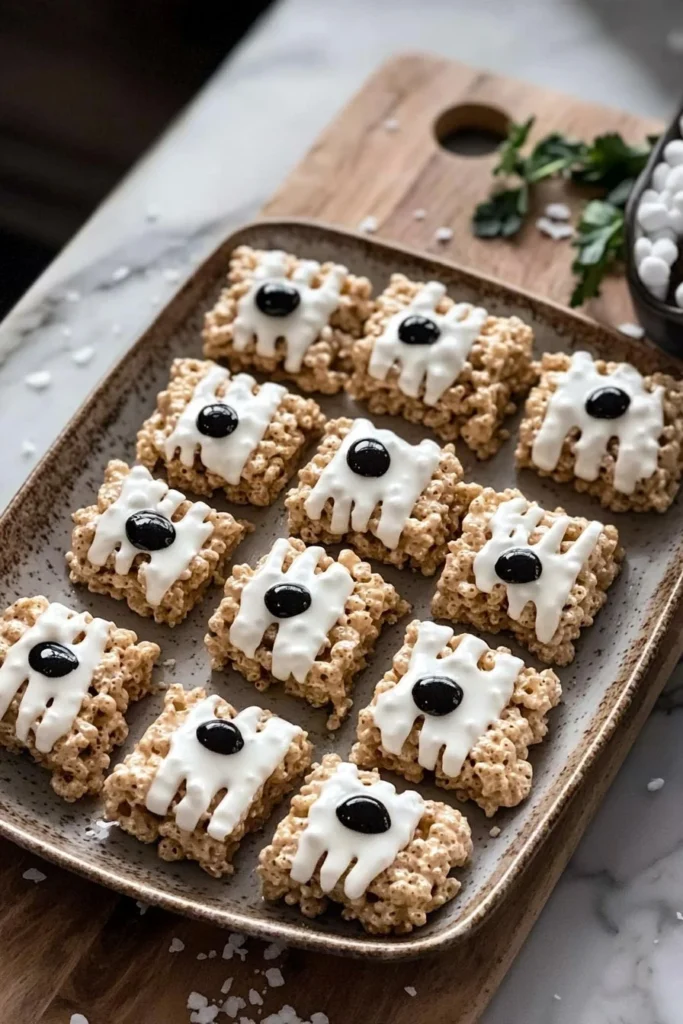
Shape and Decorate: Once cooled, cut into rectangles. Melt the white chocolate or candy melts in a microwave-safe bowl at 15-second intervals until smooth. Drizzle over the rectangles to create a spooky mummy effect. Finally, add the black candy eyes and use chocolate icing to finalize the mummy look.
Top Tips for Perfecting Mummy Rice Krispie Treats
- Substitutions: You can experiment with different cereals if you want to mix things up—Crispy Rice or even Cornflakes could work!
- Timing: Work quickly when mixing the marshmallows with the Rice Krispies, as the mixture will harden rapidly.
- Common Mistakes: Ensure your marshmallows are completely melted for smooth mixing; any lumps will result in an uneven texture.
Storing and Reheating Tips
To keep your Mummy Rice Krispie Treats fresh:
- Refrigeration: Store them in an airtight container at room temperature for up to 3 days. If you live in a humid environment, consider refrigerating to maintain their texture.
- Freezing: These treats can be frozen for up to 2 months. Just wrap them in plastic wrap and then place them in a freezer-safe bag.
- Reheating: If the treats become a bit hard, let them sit at room temperature for a few minutes. You can also pop them in the microwave for 10-15 seconds for a soft, gooey texture once more!
Now that you’re aware of all the ins and outs of making Mummy Rice Krispie Treats, gather your loved ones, roll up your sleeves, and get ready for a spine-tingling good time in the kitchen!
Mummy Rice Krispie Treats
Ingredients
Method
- Begin by greasing a 9x13 inch baking dish with butter or lining it with parchment paper for easy removal.
- In a large saucepan over low heat, melt the butter. Once melted, add the marshmallows and stir until completely melted and smooth.
- Remove the mixture from heat and add the Rice Krispie cereal. Stir until everything is thoroughly coated.
- Transfer the Rice Krispie mixture into the prepared baking dish. Using a spatula, press it down firmly into an even layer, ensuring it retains some crunch.
- Allow the treats to cool for about 30 minutes.
- Once cooled, cut into rectangles. Melt the white chocolate or candy melts in a microwave-safe bowl, drizzling it over the rectangles.
- Add black candy eyes and use chocolate icing to create the mummy look.
Leave a Reply