
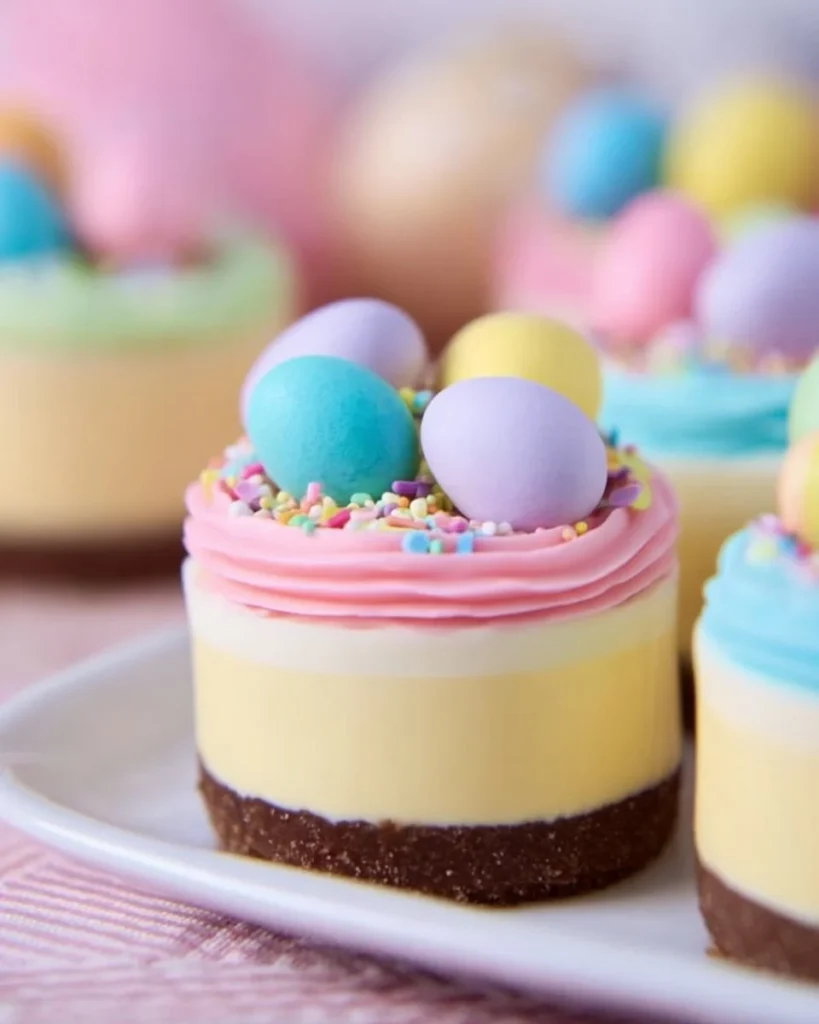
Spring has arrived, and with it comes the delightful season of family gatherings and festive treats! If you’re looking for a dessert that’s as dreamy as it is delicious, let me introduce you to Easter No-Bake Mini Cheesecakes. Imagine biting into a creamy, smooth cheesecake with a perfectly crumbly crust, all without turning on your oven! These little delights are perfect for any casual get-together, turning simple ingredients into a stunning dessert that will impress everyone.
Fun fact: No-bake cheesecakes are often credited for being one of the easiest desserts to whip up, allowing even the novice bakers among us to shine. I still remember the first time I made these with my family. We had a mini competition to see who could decorate their cheesecakes the most creatively with colorful toppings. If these no-bake mini cheesecakes are a hit in my home, I’m confident your family will love them too! They’ll evoke the same warmth and nostalgia as my popular Chocolate Avocado Mousse recipe, but with a creamy, fun twist that’s perfect for Easter or any gathering.
What is Easter No-Bake Mini Cheesecakes?
So, what exactly are these enchanting little bites known as Easter No-Bake Mini Cheesecakes? Are they really that special, or is it just a fancy name? Picture this: mini cups of velvety cheesecake that come together in mere minutes, all thanks to the magical no-bake method. They’re like the gentle sun of spring—sweet, light, and they bring everyone together! It’s true what they say, “the way to a man’s heart is through his stomach,” and these mini cheesecakes are bound to capture hearts (and stomachs) alike. Gather the family and give it a try; you might just find yourself craving more!
Why You’ll Love This Easter No-Bake Mini Cheesecakes
There’s a myriad of reasons to adore these Easter No-Bake Mini Cheesecakes! First off, they’re not just a pretty face; the silky smooth texture will leave you swooning with every delectable bite. Moreover, by creating these from scratch, you’ll save money compared to purchasing similar desserts from bakeries, allowing for more fun family outings! Not to mention, you can customize the toppings to suit any taste—imagine crushed nuts, colorful candies, or a drizzle of chocolate sauce adding an explosion of flavor and texture!
If you’ve ever enjoyed a traditional cheesecake, these mini versions offer the same rich taste, but with a flair that’s perfect for sharing and indulging in smaller portions. So why not gather your family for a fun dessert-making session? Trust me, the smiles will be worth it!
How to Make Easter No-Bake Mini Cheesecakes
Quick Overview
These Easter No-Bake Mini Cheesecakes are incredibly easy to prepare and satisfying to eat. With a whipped cream topping that’s light and fluffy, combined with a rich cream cheese base, you’re going to love how this dessert feels in your mouth—smooth and indulgent. The best part? You’ll have them ready to chill in about 30 minutes, leaving you plenty of time to host family gatherings or relax with a cup of tea!
Ingredients
- 8 oz cream cheese, softened
- 1/2 cup powdered sugar
- 1 tsp vanilla extract
- 1 cup heavy whipping cream
- 1 cup Graham cracker crumbs
- Easter-themed toppings (like chocolate eggs or colorful sprinkles)
Preparation Note: Make sure the cream cheese is softened at room temperature for easier mixing, and your whipping cream should be cold for the perfect peak!
Step-by-Step Instructions
- Prep Your Cups: Start by gathering your mini dessert cups or muffin tin liners. This will be the base for your cheesecakes!
- Make the Crust: In a mixing bowl, combine Graham cracker crumbs with a bit of melted butter (if desired) to help bind the crumbs. Spoon about a tablespoon into each cup, pressing down gently to form a crust.
- Mix the Cream Cheese: In another bowl, beat the softened cream cheese until smooth and creamy. Gradually add in powdered sugar and the vanilla extract, mixing well until there are no lumps.
- Whip the Cream: In a clean bowl, whip the cold heavy cream until stiff peaks form. This will add lightness to your cheesecake filling!
- Combine: Gently fold the whipped cream into the cream cheese mixture, ensuring you preserve the fluffiness.
- Fill the Cups: Spoon the cheesecake filling into your prepared cups over the Graham cracker crust. Smooth the tops with a spatula.
- Chill: Place the filled cups in the fridge and let them chill for at least 4 hours or overnight if you can wait that long!
- Decorate: Before serving, add your Easter-themed toppings like chocolate eggs or sprinkles, and present them with a flourish!
Top Tips for Perfecting Easter No-Bake Mini Cheesecakes
- Substitutions: If you’re looking to make these Easter No-Bake Mini Cheesecakes vegan, consider using cashew cream or silken tofu instead of cream cheese. For a lighter option, Greek yogurt can work wonders!
- Timing: If you find yourself crunched for time, you can prepare the crust ahead—just pop it in the fridge until you’re ready to fill them!
- Avoiding Common Mistakes: Make sure that your cream cheese is at room temperature; this will prevent lumps in your cheesecake filling. Also, remember not to over-whip the cream, or it could become grainy!
Storing and Reheating Tips
To keep your Easter No-Bake Mini Cheesecakes fresh, cover them with plastic wrap or store them in an airtight container in the fridge. They can last up to 5 days chilled. If you have leftovers (which is rare!), they can also be frozen for up to 3 months. When you’re ready to enjoy them, simply thaw them in the fridge overnight and add fresh toppings before serving.
Whether it’s a serene family gathering or a delightful treat to end your day, these Easter No-Bake Mini Cheesecakes are truly a recipe worth trying. Made from simple, wholesome ingredients and brimming with flavor, they’re sure to become a treasured favorite in your home!

Easter No-Bake Mini Cheesecakes
Ingredients
Method
- Start by gathering your mini dessert cups or muffin tin liners. This will be the base for your cheesecakes.
- In a mixing bowl, combine Graham cracker crumbs with melted butter to help bind the crumbs if desired. Spoon about a tablespoon into each cup, pressing down gently to form a crust.
- In another bowl, beat the softened cream cheese until smooth and creamy. Gradually add in powdered sugar and the vanilla extract, mixing well until there are no lumps.
- In a clean bowl, whip the cold heavy cream until stiff peaks form.
- Gently fold the whipped cream into the cream cheese mixture, ensuring you preserve the fluffiness.
- Spoon the cheesecake filling into your prepared cups over the Graham cracker crust. Smooth the tops with a spatula.
- Place the filled cups in the fridge and let them chill for at least 4 hours or overnight.
- Before serving, add your Easter-themed toppings like chocolate eggs or sprinkles, and present them.
Leave a Reply