
Homemade Danish Butter Cookies: A Delightfully Buttery Treat!
Are you ready to indulge in an irresistible treat that melts in your mouth? Look no further than homemade Danish butter cookies! These delightful little morsels are crisp on the outside and tender on the inside, boasting a rich buttery flavor that will make you swoon. Whether you’re hosting a tea party, celebrating a special occasion, or simply craving a sweet snack, these cookies are the perfect solution. Fun fact: Danish butter cookies, often packaged in charming tins, are a beloved tradition during the holidays and make for great gifts. What makes them even better? They’re incredibly simple to prepare, taking mere minutes to whip up! If you enjoy other easy recipes like my classic chocolate chip cookies, you’ll adore these too. So grab your mixing bowl and let’s create a batch of these heavenly cookies that everyone will love!

What is Homemade Danish Butter Cookies?
Have you ever wondered what makes Danish butter cookies so special? First off, the name gives a hint of the deliciousness inside—not just any cookies, they are a buttery dream come true! “Danish” implies a cultural element, linking the cookies to Denmark where these treats originated. But let’s be real, who doesn’t want a cookie that’s as rich and satisfying as a warm hug? It’s often said that “the way to a man’s heart is through his stomach,” and these cookies could easily be the golden ticket! Whether you’re indulging solo or sharing with loved ones, you can’t go wrong with inviting these buttery delights into your life. So roll up your sleeves, don your apron, and let’s get baking!
Why You’ll Love This Homemade Danish Butter Cookies
The charm of homemade Danish butter cookies lies in their simplicity, flavor, and budget-friendliness. These cookies pack a punch of buttery goodness that rivals anything you could buy in a store. Plus, making them at home means you can enjoy fresh cookies anytime without breaking the bank! With just a few everyday ingredients like flour, sugar, and butter, you can create a classic treat that will delight your senses. These cookies also feature versatile options for toppings, whether you prefer a sprinkle of sugar for added crunch, a drizzle of chocolate for decadence, or even nuts for texture. If you love butter cookies, definitely check out my shortbread cookie recipe as well for another melt-in-your-mouth experience. So, why not take a few minutes to whip up a batch of these delightful cookies at home?
How to Make Homemade Danish Butter Cookies
Quick Overview
Homemade Danish butter cookies are easy to make and satisfying. With a prep time of only about 20 minutes and a baking time of 10-12 minutes, you can have a deliciously warm batch ready in no time. They are not just about taste; their delicate texture and buttery flavor will leave you wanting more. Let’s dive in and learn how to create these simple delights!
Key Ingredients for Homemade Danish Butter Cookies
Here’s everything you’ll need to whip up a scrumptious batch of Danish butter cookies:
- 1 cup (226g) unsalted butter, softened
- 2/3 cup (85g) powdered sugar
- 1 teaspoon vanilla extract
- 2 cups (250g) all-purpose flour
- 1/4 teaspoon salt
- Optional: Granulated sugar or chocolate chips for topping
Step-by-Step Instructions
- Prepare Your Oven: Preheat your oven to 350°F (175°C) and line a baking sheet with parchment paper.
- Cream Butter and Sugar: In a large mixing bowl, beat the softened butter and powdered sugar together until it’s light and fluffy. This should take about 3-4 minutes.
- Add Vanilla: Mix in the vanilla extract until well incorporated.
- Alternate Dry Ingredients: Gradually add the flour and salt to the butter mixture, mixing on low speed until just combined. Be careful not to overmix, or your cookies may turn tough.
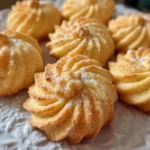
- Shape the Cookies: You can use a piping bag fitted with a star tip for a classic look, or simply scoop tablespoons of dough onto the prepared baking sheet. Leave some space between each cookie as they may spread slightly.
- Add Toppings: If desired, sprinkle a little granulated sugar over the cookies or press a chocolate chip into the center of each cookie for an added treat.
- Bake: Transfer the baking sheet to the oven and bake for 10-12 minutes, or until the edges are lightly golden.
- Cool and Enjoy: Allow the cookies to cool on the baking sheet for a few minutes before transferring them to a wire rack to cool completely.
What to Serve Homemade Danish Butter Cookies With
These delicious cookies pair beautifully with various accompaniments. You can enjoy them with a hot cup of tea or coffee for a delightful afternoon snack. Alternatively, serve them with a scoop of vanilla ice cream for an elegant dessert experience. For a bit of flair, pair them with fresh fruit like strawberries or blueberries, adding a refreshing contrast to the rich butter flavor. The combination is simply heavenly!
Top Tips for Perfecting Homemade Danish Butter Cookies
- Butter Consistency: Ensure your butter is at room temperature for easy blending, but not melted.
- Chill the Dough: If your dough feels too soft, refrigerate it for about 30 minutes to help maintain shape while baking.
- Don’t Overbake: Keep an eye on the baking time! Only bake till golden at the edges—this ensures a tender center.
- Experiment with Flavors: Feel free to add almond extract or lemon zest for a flavor twist!
Storing and Reheating Tips
Leftover cookies can be stored in an airtight container at room temperature for up to one week. If you want to keep them for longer, consider freezing them! Just place the cookies in a single layer in a freezer bag or airtight container, separating layers with parchment paper, and they can last for up to three months. When you want to enjoy them, simply let them thaw at room temperature. For a warm treat, pop them in the microwave for 10-15 seconds. Enjoy your homemade Danish butter cookies!
With these easy instructions and helpful tips, you are set to bake the best homemade Danish butter cookies ever! Treat yourself and your loved ones to these delightful confections today!
Homemade Danish Butter Cookies
Ingredients
Method
- Preheat your oven to 350°F (175°C) and line a baking sheet with parchment paper.
- In a large mixing bowl, beat the softened butter and powdered sugar together until it’s light and fluffy. This should take about 3-4 minutes.
- Mix in the vanilla extract until well incorporated.
- Gradually add the flour and salt to the butter mixture, mixing on low speed until just combined. Be careful not to overmix.
- You can use a piping bag fitted with a star tip for a classic look, or simply scoop tablespoons of dough onto the prepared baking sheet. Leave some space between each cookie.
- If desired, sprinkle a little granulated sugar over the cookies or press a chocolate chip into the center of each cookie.
- Transfer the baking sheet to the oven and bake for 10-12 minutes, or until the edges are lightly golden.
- Allow the cookies to cool on the baking sheet for a few minutes before transferring them to a wire rack to cool completely.
Leave a Reply