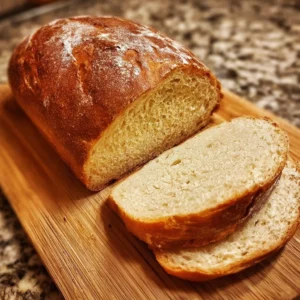
Gluten-Free Bread: A Slice of Happiness in Every Bite!
Are you on a gluten-free journey and craving the comfort of freshly baked bread? Well, you’re in luck! This gluten-free bread recipe is here to save the day with its simple preparation and delightful flavor. Imagine the aroma of warm bread wafting through your kitchen, enticing everyone to gather around the table. Not only is it gluten-free, but it’s also incredibly versatile, making it perfect for sandwiches, toast, or simply enjoying with a pat of butter.
Did you know that gluten-free bread has come a long way since its early days? It used to be dense and crumbly, but modern recipes have transformed it into something that rivals traditional bread. In fact, this recipe is so easy and delicious that even your non-gluten-free friends will be asking for seconds! If you’re a fan of my Lemon Poppy Seed Muffins, you’re bound to love the fluffy and satisfying experience this gluten-free bread brings. So, roll up your sleeves, and let’s get baking!

What is Gluten-Free Bread?
Now, you might be wondering, “What on Earth is gluten-free bread?” Well, let me break it down for you! Simply put, gluten-free bread is made without wheat or any gluten-bearing grains, which makes it suitable for those with gluten sensitivities or celiac disease. You might think this means sacrificing taste or texture, but prepare to be pleasantly surprised! Imagine biting into a loaf that’s soft, tender, and full of flavor. It’s like a delightful hug for your taste buds!
And why is it called “bread,” you may ask? Well, because, just like Grandma always said, “the way to a man’s heart is through his stomach,” and we all know everyone appreciates a good slice of bread! So, don’t hesitate to give this recipe a whirl, and let’s channel our inner bakers together!
Why You’ll Love This Gluten-Free Bread
When it comes to gluten-free bread, there are a few fantastic reasons you’ll absolutely adore this recipe. First, it’s incredibly simple to make! With just a handful of ingredients, you’ll have a wholesome loaf ready in no time. Plus, making it at home is a great way to save money compared to store-bought options, which can often be pricey and lacking in quality.
The best part? You can customize it to your heart’s content! Top it with your favorite spreads or use it as the base for delicious sandwiches. Whether you prefer classic butter, tangy jam, or avocado toast, this gluten-free bread has got you covered. If you’ve tried my Cheesy Garlic Breadsticks, you’ll know how much fun it is to play with flavors! So, gather your ingredients and give this gluten-free bread a go—you won’t regret it!
How to Make Gluten-Free Bread
Quick Overview
Making gluten-free bread is not just easy; it’s also fun! With a prep time of about 10 minutes and a baking time of roughly 45 minutes, you can have a warm loaf ready to enjoy with your meals. You’ll love the delightful fluffy texture and rich flavor that comes from just a few simple ingredients.
Key Ingredients for Gluten-Free Bread
- 2 cups gluten-free all-purpose flour
- 1 cup warm water (110°F)
- 3 tablespoons honey or maple syrup
- 1 tablespoon active dry yeast
- 1 teaspoon salt
- 1 tablespoon olive oil
- 1 teaspoon apple cider vinegar
Step-by-Step Instructions:
- Activate the Yeast: In a small bowl, combine warm water and honey. Sprinkle the yeast on top and let it sit for about 5-10 minutes until it becomes foamy.
- Mix Dry Ingredients: In a large mixing bowl, whisk together the gluten-free flour and salt.
- Combine Mixtures: Once the yeast is activated, add it to the dry ingredients, along with olive oil and apple cider vinegar. Mix until a smooth dough forms.
- Knead & Rise: Transfer the dough to a greased loaf pan. Cover it with a clean kitchen towel and let it rise in a warm spot for about 30-40 minutes, or until it doubles in size.
- Bake the Bread: Preheat your oven to 350°F (175°C). Bake the bread for about 40-45 minutes, or until the top is golden brown and sounds hollow when tapped.
- Cool & Enjoy: Allow the bread to cool in the pan for 10 minutes, then remove it and let it cool completely on a wire rack before slicing.
What to Serve Gluten-Free Bread With
Gluten-free bread is so versatile that it pairs beautifully with a variety of dishes. Here are a few delicious suggestions:
- Soups: Enjoy it with a hearty bowl of tomato or vegetable soup for the ultimate comfort meal.
- Salads: For a fresh lunch, pair it with a vibrant salad drizzled with your favorite dressing.
- Spreads: Try it with creamy avocado, homemade hummus, or nut butters for a tasty snack.
- Sandwiches: Use it to create delightful sandwiches loaded with your choice of fillings, from classic turkey to a veggie delight.
Top Tips for Perfecting Gluten-Free Bread
- Flour Selection: Not all gluten-free flours are created equal! Make sure to use a high-quality gluten-free flour blend for the best results.
- Don’t Rush the Rise: Allowing the dough to rise properly is key to achieving that fluffy texture. Keep it warm, and be patient!
- Experiment with Flavors: Feel free to add herbs, seeds, or even a sprinkle of cheese to elevate the flavor of your bread.
Storing and Reheating Tips
To keep your gluten-free bread fresh, store it in an airtight container at room temperature for up to 3 days. For longer storage, you can freeze slices individually wrapped in plastic wrap and placed in a freezer bag. They can last up to 3 months in the freezer. To reheat, simply toast slices directly from the freezer or let them thaw at room temperature.
Now that you have the complete guide on how to make, enjoy, and care for your gluten-free bread, it’s time to roll up your sleeves and start baking. You and your loved ones are bound to fall in love with this delicious, homemade staple! So, what are you waiting for? It’s time to create a loaf that will bring smiles to every table!

Gluten-Free Bread
Ingredients
Method
- In a small bowl, combine warm water and honey. Sprinkle the yeast on top and let it sit for about 5-10 minutes until it becomes foamy.
- In a large mixing bowl, whisk together the gluten-free flour and salt.
- Once the yeast is activated, add it to the dry ingredients, along with olive oil and apple cider vinegar. Mix until a smooth dough forms.
- Transfer the dough to a greased loaf pan. Cover it with a clean kitchen towel and let it rise in a warm spot for about 30-40 minutes, or until it doubles in size.
- Preheat your oven to 350°F (175°C). Bake the bread for about 40-45 minutes, or until the top is golden brown and sounds hollow when tapped.
- Allow the bread to cool in the pan for 10 minutes, then remove it and let it cool completely on a wire rack before slicing.

Leave a Reply