
A Taste of Japan Right at Home
Welcome to the world of flavor-packed comfort food with these delightful Japanese Katsu Bowls topped with a luscious tonkatsu sauce! If you’ve ever craved a meal that’s not only delicious but also extremely satisfying, then you’re in for a treat. This dish is the epitome of crunchy, savory goodness, combining crispy breaded cutlets with fluffy rice and fresh veggies. Fun fact: Katsu actually means “cutlet” in Japanese, but the dish has taken on a life of its own worldwide!
What makes these Katsu Bowls special is their simplicity—perfect for busy weeknights yet impressive enough for a weekend gathering! It’s a fantastic recipe that you can whip up in under 30 minutes, making it suitable for families and anyone looking to enjoy authentic flavors without spending hours in the kitchen. If you’ve tried our Teriyaki Chicken recipe, you know that quick and delicious meals are our forte. So why not add a Katsu Bowl to your culinary repertoire? Let’s get cooking!

What is Japanese Katsu Bowls with Tonkatsu Sauce?
Have you ever pondered the origins of such a delightful name as “Katsu”? Well, it’s derived from the word “katsuretsu,” which means cutlet in Japanese. But really, isn’t it just fun to say? Katsu can tickle your tongue while it tantalizes your taste buds! Imagine friends gathered, eagerly awaiting your culinary masterpiece—you might just hear someone say, “The way to a man’s heart is through his stomach,” as they devour this delicious dish! We all know that good food brings people together, so why not dive into this Katsu adventure today?
Why You’ll Love This Japanese Katsu Bowl
Let’s talk about what makes these Japanese Katsu Bowls a must-try. First and foremost, the star of the show: the crispy, golden-brown Katsu is unbelievably satisfying and pairs perfectly with a drizzle of rich tonkatsu sauce. The second wonderful aspect is the cost-saving benefit. Forget about takeout! You can make a filling and restaurant-quality meal right in your own kitchen—at a fraction of the cost.
Finally, let’s not forget the incredible toppings or ingredients that elevate this bowl. Fresh cilantro, scallions, or even a poached egg can take your Katsu Bowl from simple to sensational! If you loved our Chicken Katsu Curry recipe, you’re really going to enjoy this one for its contrasting flavors and textures. Serving these bowls will surely impress your family and friends—challenge accepted!
How to Make Japanese Katsu Bowls with Tonkatsu Sauce
Quick Overview
Making Japanese Katsu Bowls is surprisingly simple, delicious, and incredibly satisfying. This dish focuses on crispy Katsu that contrasts wonderfully with fluffy rice and vibrant veggies. Best of all, you can have this nourishing meal ready in about 30 minutes. Perfect for a busy weeknight or an easy family meal, you can’t go wrong with this one!
Key Ingredients for Japanese Katsu Bowls
- 4 boneless chicken thighs (or your protein of choice)
- 1 cup panko breadcrumbs
- 1 cup all-purpose flour
- 2 eggs, beaten
- Salt and pepper, to taste
- Vegetable oil, for frying
- Cooked white rice (enough to serve 4)
- Fresh vegetable toppings like shredded cabbage or sliced cucumbers
- Tonkatsu Sauce (available at most grocery stores or homemade)
Step-by-Step Instructions
- Prepare the Chicken: Pat dry the chicken thighs with paper towels, seasoning both sides with salt and pepper.
- Set Up Breading Stations: In three separate bowls, place flour, beaten eggs, and panko breadcrumbs.
- Bread the Chicken: Dredge each chicken thigh in flour, dip into beaten eggs, and then coat with panko breadcrumbs to create an even layer.
- Fry the Katsu: In a large skillet, heat about 1/4 inch of vegetable oil over medium-high heat. Once hot, carefully place breaded chicken into the oil. Cook for about 4-5 minutes per side, or until golden brown and cooked through.
- Drain the Grease: Once done, transfer the cooked Katsu to a paper towel-lined plate to drain excess oil.
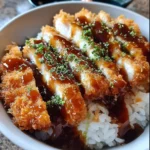
- Assemble the Bowls: On a serving plate, put a bed of fluffy white rice, carefully slice the Katsu, and lay it on top. Drizzle tonkatsu sauce generously over the chicken, followed by your choice of fresh vegetable toppings.
What to Serve Japanese Katsu Bowls With
Considering sides that could complement your Katsu Bowl can be equally delightful. You could serve them with a gentle miso soup or a fresh cucumber salad to balance the flavors. A refreshing green tea or even a zesty lemonade would pair nicely. Why not try a side of pickled vegetables to enhance the umami experience?
Top Tips for Perfecting Japanese Katsu Bowls
- Use a Deep Fry Thermometer: Maintaining the oil temperature at around 350°F can ensure a perfect crispy exterior without greasy results.
- Experiment with Proteins: While chicken thighs are commonly used, feel free to experiment with eggplant or tofu for a vegetarian version!
- Don’t Skip the Sauce: Tonkatsu sauce is essential—without it, your Katsu Bowl would feel incomplete.
Storing and Reheating Tips
If you find yourself with leftovers (although that’s a rare occurrence), store the Katsu separately from the rice and veggies to prevent sogginess. Properly stored, the chicken will stay fresh in the fridge for about 3 days. To reheat, place it in the oven at 350°F for about 10-15 minutes, allowing the coating to regain its crispiness. If you wish to save it for later meals, Katsu can also be frozen in an airtight container for up to three months—perfect for those speedy dinners!
Let your taste buds embark on this incredible journey with Japanese Katsu Bowls with Tonkatsu Sauce. This recipe not only shines with its flavors but also adds warmth and joy to your dinner table. Ready to make your own? Happy cooking!
Japanese Katsu Bowls with Tonkatsu Sauce
Ingredients
Method
- Pat dry the chicken thighs with paper towels and season both sides with salt and pepper.
- Set up three separate bowls: one with flour, one with beaten eggs, and one with panko breadcrumbs.
- Dredge each chicken thigh in flour, dip into the beaten eggs, and then coat with panko breadcrumbs, ensuring an even layer.
- In a large skillet, heat about 1/4 inch of vegetable oil over medium-high heat.
- Once the oil is hot, carefully place the breaded chicken into the oil. Cook for about 4-5 minutes per side, or until golden brown and cooked through.
- Transfer the cooked Katsu to a paper towel-lined plate to drain excess oil.
- On a serving plate, create a bed of fluffy white rice.
- Carefully slice the Katsu and lay it on top of the rice.
- Drizzle tonkatsu sauce generously over the chicken and add your choice of fresh vegetable toppings.
Leave a Reply